
WordPress is the most popular CMS available today. And part of the reason behind that is the amount of choice you have when using it. At least when you’re using the self-hosted version.
And hosting is one of the first choices you’ll need to make-after choosing and registering your domain name.
There are seemingly endless options when it comes to hosting providers. Some that will only cost you a few dollars a month for a cheap shared hosting plan that offers you a cPanel, to hosting that can cost you $100 or more a month for managed WordPress hosting.
In the simplest of terms, shared hosting is cheap because it means most of the backend or maintenance involved with running a WordPress site is left up to you. Backups, performance optimization, and more.
Managed WordPress hosting is more expensive because all that work is done for you. For a fee.
But there is another option many aren’t aware of, which is why I’m going to show you how to install WordPress on AWS.
Table of Contents
1. What is AWS?
2. Who Should Use Amazon Lightsail?
AWS Lightsail Pros
AWS Lightsail Cons
3. Should You Install WordPress Apps + OS or OS Only?
4. How to Install WordPress on AWS Lightsail
Step 1. Set up an AWS Account
Step 2. Create an Instance
Step 3. Connect to Your Instance
Step 4. Set up a Static IP Address
Step 5. Log into WordPress
Step 6. Create DNS Zone
1. What is AWS?
AWS stands for Amazon Web Services. Yes, that Amazon! They are a subsidiary of the giant retailer, and they offer a range of cloud computing platforms.
Not that long ago, anyone who was interested in how to install WordPress on AWS would have been thinking about installing it on one of their Amazon Elastic Compute Cloud (EC2). This is a service that provides scalable computing capacity in the cloud.
Source: Amazon
But using EC2 is not for the faint of heart. There is a steep learning curve and it’s better suited for someone with a measure of systems admin experience.
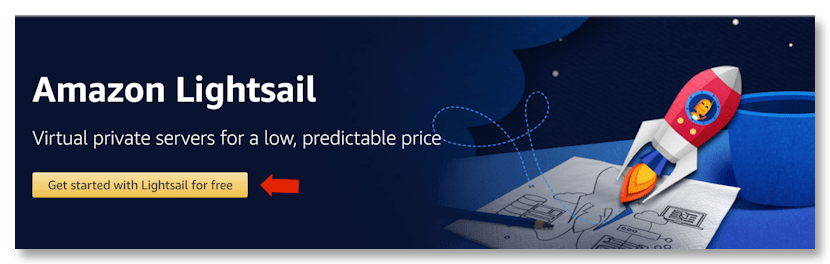
In 2016 Amazon announced Amazon Lightsail as direct competition for virtual private servers such as DigitalOcean. And just like other VPSs, it offers a package that includes a server, storage space, and data transfer limits. It's generated a lot of interest with many deciding they would install WordPress on AWS instead of using shared hosting.
For those not in the know, a VPS is a single powerful server that is split into multiple virtual servers using virtualization technology. Each person who gets a piece of the original gets their own RAM and CPU, which is where the private part of VPS comes in.
One of the biggest advantages of a VPS over shared hosting is that you have control over who is using the server. You, and you alone. When you’re using cheap shared hosting, the chances are high you’re on the same server with someone less than reputable. If they are sending lots of spam, your server can get blacklisted, and your emails are blocked too.
The other reason is the amount of resources everyone is using. If another site is eating through resources, it will slow your site down too.
Since Lightsail is both easier to use and a cheaper alternative to EC2, our how to install WordPress on AWS guide will be focusing on a step-by-step walkthrough using Lightsail.
2. Who Should Use Amazon Lightsail?
Before we get into how to install WordPress on AWS, let’s talk about whether or not this is a service any and everyone should use.
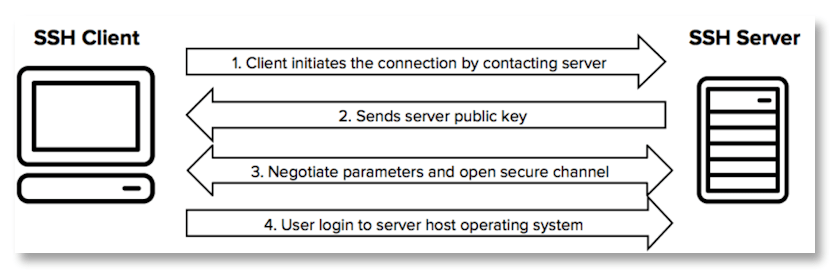
I mentioned above that Lightsail isn’t anywhere near as complex as EC2 and it isn’t. But I don’t want to give the sense that installing it and setting it up is dead easy. Especially if you need to install an OS and LAMP, not just the WordPress blueprint. If you’re a sysadmin, yes, it will be. But if you’re unfamiliar with network protocols and SSH or terms like sudo, you might be a bit lost.
But don’t be put off. Even if you just have limited technical abilities, you should be able to follow our guide. Especially since I’m showing you the easy way not the hard way.
Let’s look at some of the pros and cons. That might help you decide whether or not you want to go ahead and follow our how to install WordPress on AWS Lightsail.
AWS Lightsail Pros
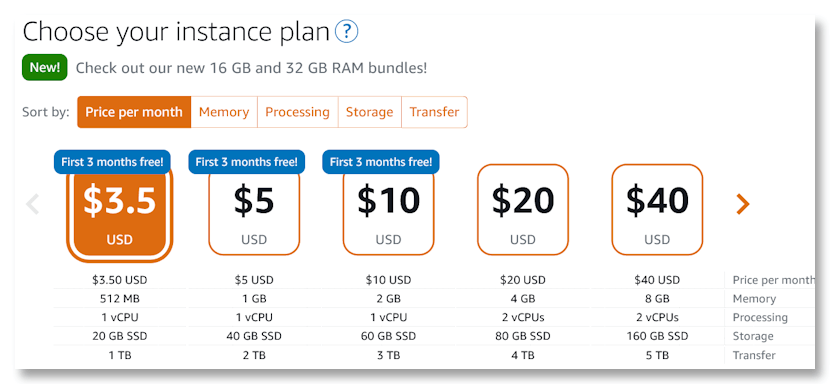
Fixed pricing. When compared to EC2, which often left users shocked at unexpected costs, Lightsail’s fixed-priced model means no surprises. Current prices are from US$3.50 per month for 512 MB of memory and 20 GB SSD of storage all the way up to US$160 per month for 32 GB of memory and 640 GB SSD of storage.
If you have a small website with little traffic, the choice to install WordPress on AWS Lightsail is a smart one.
Scalability. If your website or application grows in size and that smaller instance (server) you started with is no longer sufficient for your needs, you can scale up. You simply choose an upgraded plan and migrate everything without any loss of data.
You also have the option of using a load balancer. This can help if your site or application tends to experience spikes and variations in traffic.

Source: Amazon Lightsail
And should you eventually outgrow Lightsail completely, you can even scale up to EC2.
Networking made easy. Lightsail takes the challenge out of DNS settings and static IPs. From the dashboard, simply choose Networking, and in a few easy clicks, make the changes you need.
Installing WordPress on AWS is a smart choice but there are some drawbacks.
AWS Lightsail Cons
It’s not for enterprise-size workloads. If you’re sold on the ease of use and the pricing, I hate to break this to you. Lightsail is marketed toward smaller-scale workloads. This means you need to look at EC2, which can handle a site or application that could have thousands of users in a day.
3. Should You Install WordPress Apps + OS or OS Only?
Before getting to the how to install WordPress on AWS Lightsail tutorial, I want to point out some options and limitations.
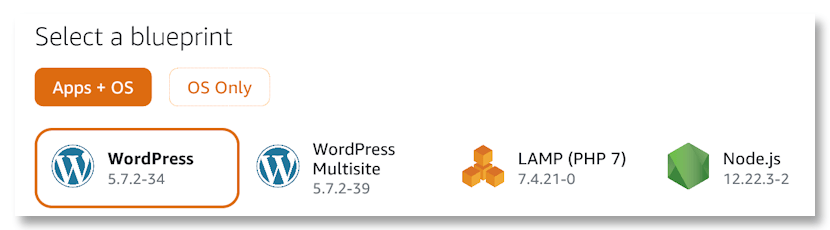
When you’re creating your instance—VPS—you are given an option to select a blueprint that your server will be built upon. You can go the easy route and select Apps + OS > WordPress or you can choose OS Only. For the sake of this tutorial, I’m recommending and providing a walkthrough of the Apps + OS option.
Let me detail the differences and limitations.
Choosing Apps + OS > WordPress will install everything needed to run a WordPress site. Within seconds and with just a few clicks. But depending on where you had your site hosted before you may quickly realize you’re missing something.
Most notably, you’re missing a cPanel. Or whatever proprietary panel your old host used. This is where you do things like the following:
- Add new and subdomains
- Redirect domains
- Create, access, and manage your databases
- Create and manage email accounts
- Use your file manager
- Manage backups
- Add FTP accounts
- Connect to a CDN
That’s just a few of the things you can and at times need to do via a control panel such as cPanel.
With the Apps + OS > WordPress install you get your WordPress site and admin and that’s it. And you only get one WordPress install on a single domain. So if you have a WordPress Multisite or if you have several individual domains and sites you want to host, this isn’t the choice for you.
Obviously, if you have a WordPress Multisite, then it’s the Apps + OS blueprint you’ll choose. If you have several individual domains, you need to go the OS Only route which is much more complicated. You need to install the OS of your choice plus a LAMP stack, which is all the software that WordPress needs in order to run.
LAMP stands for Linux, Apache, MySQL, and PHP.
So now that that’s cleared up, let’s move on with our step-by-step guide of how to install WordPress on AWS.
4. How to Install WordPress on AWS Lightsail
Now that you’ve decided that Lightsail is the right choice for you, let’s proceed with a step-by-step guide on how to install WordPress on AWS.
And if you don’t already have one, the first thing you’ll need is an AWS account.
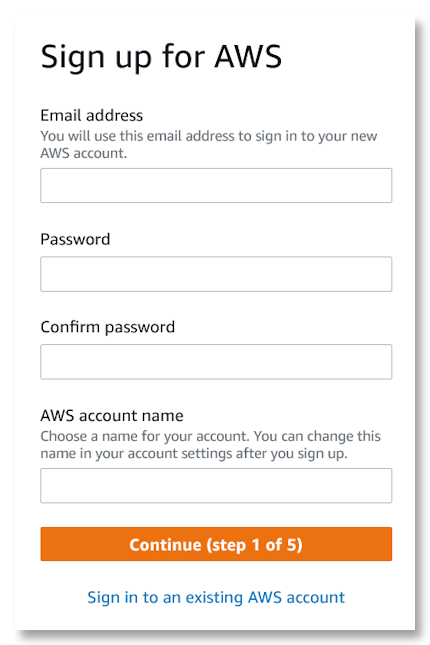
1. Set up an AWS Account
Head to the Lightsail home page to get started. This will redirect you to the AWS portal where you create an account for all of the AWS services. It’s a bit of a process but complete the steps and be sure to document everything.
Source: AWS Console
Once you have your account set up, it’s time to dive deep into learning how to install WordPress on AWS Lightsail!
2. Create an Instance
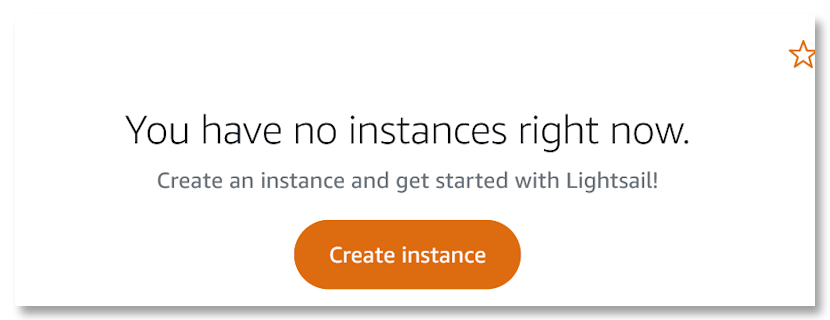
Your Lightsail Instance is your virtual private server that will live in the AWS Cloud. Click Create Instance.
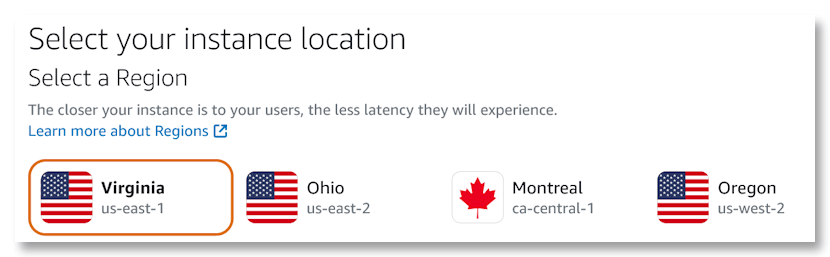
On the next page, you’ll need to choose your server location. Click AWS Region & Availability

When choosing the location of your instance, you don’t want to choose the location that’s closest to you. You want a location that’s close to your users. For example, I’m in Canada but if I had a website or application that targeted users in the UK, I would choose to create an instance in London.
Here is a list of regions where Lightsail currently has servers:
| US East (Ohio) (us-east-2) |
| US East (N. Virginia) (us-east-1) |
| US West (Oregon) (us-west-2) |
| Asia Pacific (Mumbai) (ap-south-1) |
| Asia Pacific (Seoul) (ap-northeast-2) |
| Asia Pacific (Singapore) (ap-southeast-1) |
| Asia Pacific (Sydney) (ap-southeast-2) |
| Asia Pacific (Tokyo) (ap-northeast-1) |
| Canada (Central) (ca-central-1) |
| EU (Frankfurt) (eu-central-1) |
| EU (Ireland) (eu-west-1) |
| EU (London) (eu-west-2) |
| EU (Paris) (eu-west-3) |
| EU (Stockholm) (eu-north-1) |
I’ve always set up my servers in Virginia and will do so for the sake of this tutorial.
The next step in creating an instance is to choose the platform you want. First, you want to choose Linux or Windows. I have never had a server on Windows, so we’re going with Linux.
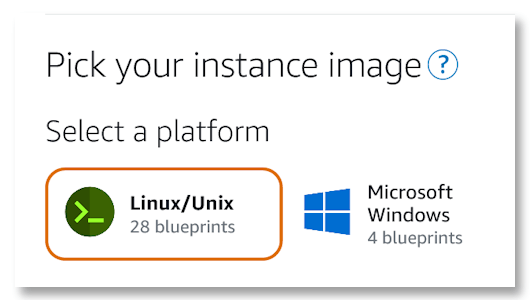
From there, you need to select the blueprint you want to use. You have the option of choosing Apps + OS > WordPress or OS Only. Each will get you a full WordPress install, but I’m going to show you how to install WordPress on AWS Lightsail using the first option. Apps + OS.
This is the easiest of the options and will get you where you want to go faster.
The next step is to choose what plan you want. In this case, since we’re just installing the WordPress blueprint, if you have a small site that doesn’t get a lot of traffic, the smallest tier plan will be sufficient.
I do not recommend the same plan if you are going the OS and LAMP stack route. In my opinion, to install WordPress on AWS in this scenario, you’ll need at least 1 GB of memory for that, especially if you add a control panel.
If you’ve never used Lightsail before, you have the added bonus of being able to sign up for a plan and get the first three months free.
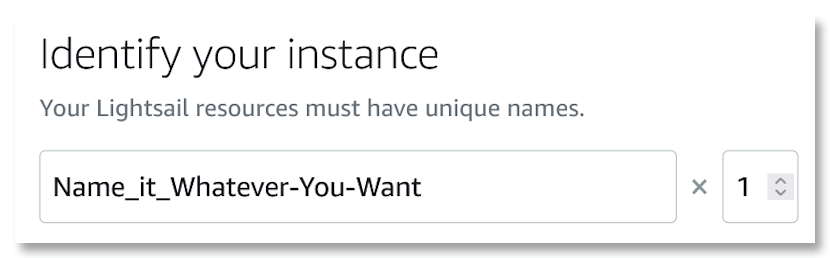
Once you’ve selected the plan you want, you’ll need to name your instance. You can name it whatever you want but note that each instance you create will need its own unique name. You are also limited to using letters, numbers, hyphens, and underscores.
Now you’ve completed creating your instance so all you need to do is scroll down to the end of the page and select Create Instance.
Step 2 of how to install WordPress on AWS wasn’t hard at all, was it?
Step 3. Connect to Your Instance
As soon as you select Create Instance you will be redirected to your Lightsail Dashboard. You’ll see the instance you just created, but it will be pending.
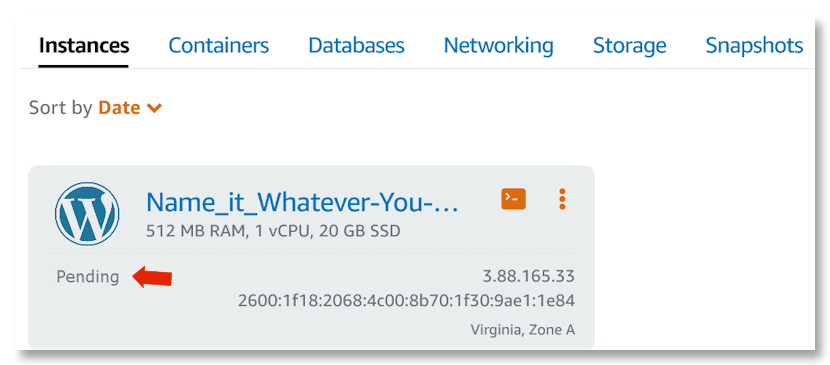
Wait until it changes and it says Running instead of Pending. This typically only takes a minute or two.
When it says it’s running, click on the name of your instance. It’s a link. You’ll be taken to the dashboard of the instance.
Before going any further, let’s make sure your instance is installed properly.
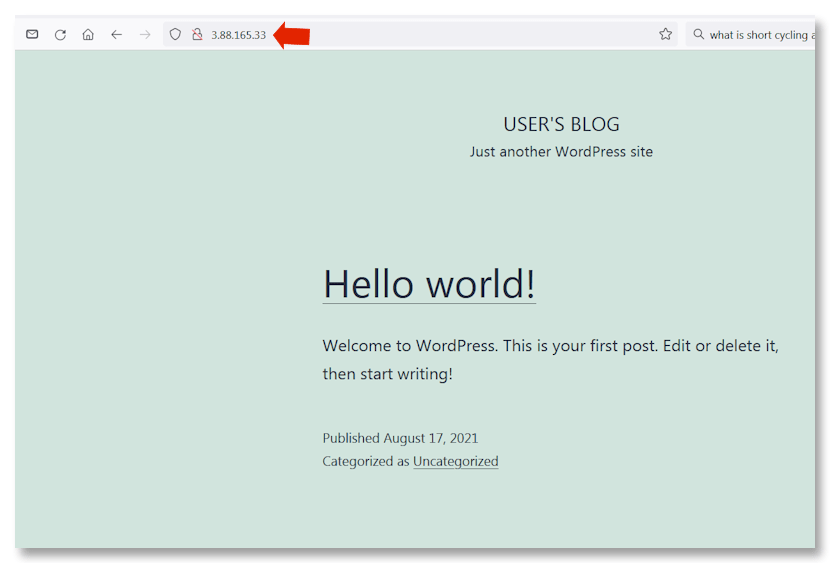
At the top right of your instance, copy your public IP address and then paste it into a new browser tab.
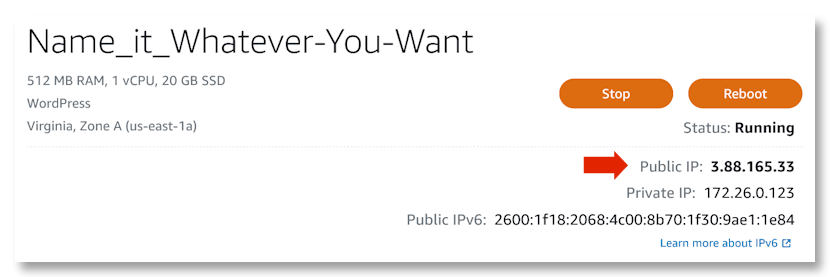
If all went well, your site should be there. You have installed WordPress on AWS. Leave the tab open.
Now, head back to your instance’s dashboard, scroll down and click on Connect Using SSH.
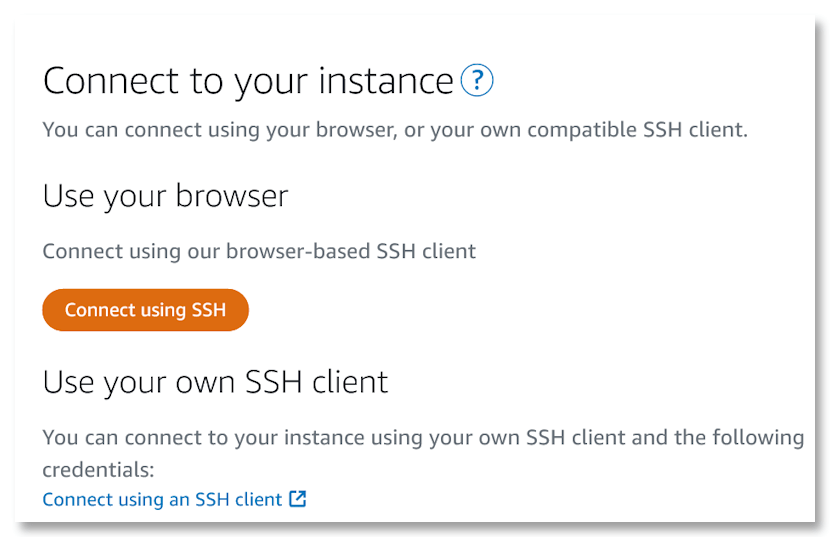
If you use your own SSH client, click on that link instead. If you don’t know what that means, just click on the orange button. When you do this a new window that looks like a terminal window will open.
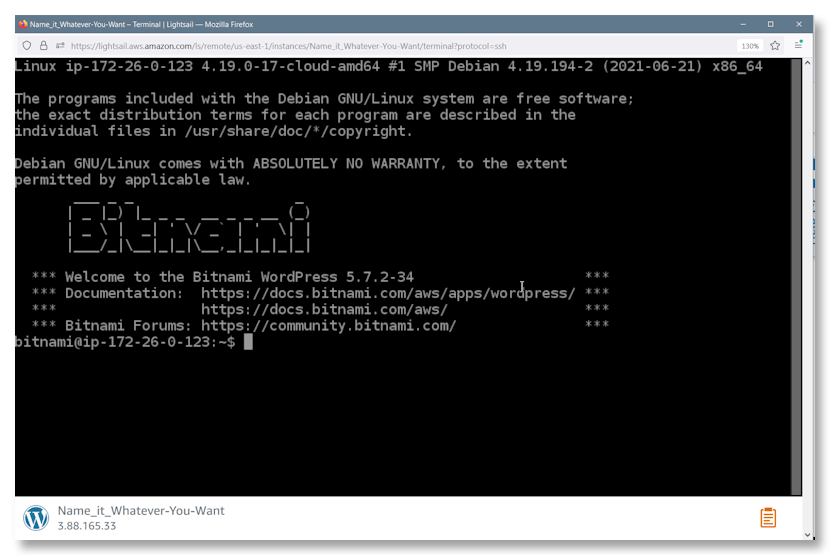
The first thing you need to do here is to find out what your WP admin password is. Copy the following and then paste it at the cursor using your right mouse button. Once you’re done, hit enter.
cat bitnami_application_password
Your password will show up at the bottom. Again using your mouse, copy and save your password somewhere. When you’re done, close the window and head back to the browser tab with your WordPress install.
Step 4. Set up a Static IP Address
The next isn’t a necessary step when it comes to how to install WordPress on AWS, but I do recommend it.
If you keep the public IP address you were assigned, it will change every time you stop and start your instance. This is a giant pain because it means you need to keep updating your DNS records.
You’re probably still on your instance’s dashboard. Go to the Networking tab on the menu. Click on the link that says Create Static IP under your public Ip.
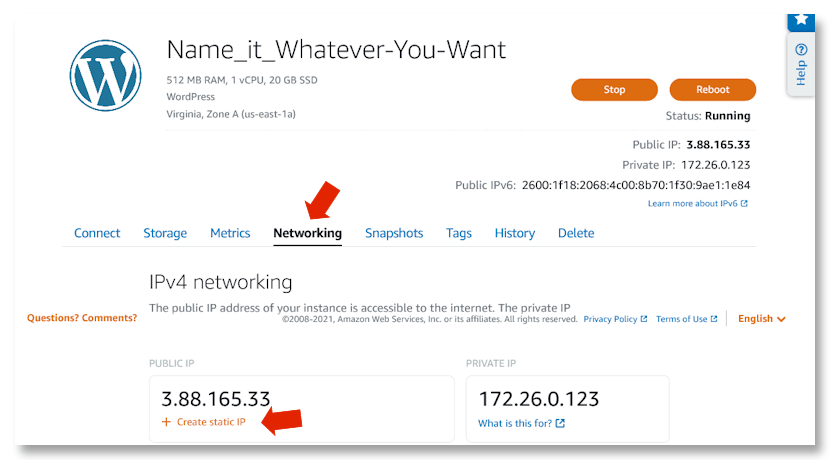
After you click on the link, you need to name your static IP and then create it and then attach it to your instance.
Step 5. Log into WordPress
We’re nearly done with our how to install WordPress on AWS Lightsail walkthrough.
Next, you’ll need to append your address here. Add /wp-login.php to the end of your IP address. So it will now look like this:
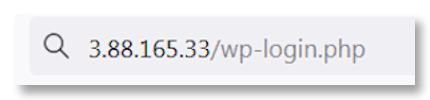
From there, you’ll be greeted with your WordPress admin login. You’ve been assigned USER as your username, and you need to use the password you copied in the last step.
Enter those, and you’ll be on the dashboard of your new WordPress site.
The first thing you should do here is to change your username in the admin panel. You can either go ahead now and install your themes and plugins or wait until you’ve completed the last step.
Now that you know everything is installed as it should be, there are a few other critical steps to handle before we’re done with our how to install WordPress on AWS tutorial.
Step 6. Create DNS Zone
Now for the final step of how to install WordPress on AWS Lightsail. Your website is ready, but you need to point it to your custom domain name.
Head back to the main Lightsail dashboard and select the Networking tab from the menu. From there, select the orange Create DNS Zone button, then scroll down and enter your domain name in the field. On the next page, you will get a list of name servers.

In order to set up your DNS and connect your WordPress installation to your Lightsail instance, you’ll need to log into your domain registrar’s website. Most of them provide details on how to update DNS on their site, so find that, and using the name servers you got from Lightsail, make the changes.
And you’re done!
You know have all the information needed to decide on using Lightsail, as well as how to install WordPress on AWS.
Wrapping Up
AWS Lightsail is just one choice of many when it comes to hosting your site. Now that you know how to install WordPress on AWS, what will your choice be?
Lightsail is a lightweight, cheap, and easy-to-use VPS. But using a VPS isn’t for everyone and as mentioned above, there are some drawbacks to this simple installation. The biggest, in my opinion at least, is the lack of a control panel. But I don’t think that will matter to a lot of people.
Speaking about controlling your WordPress installation. Have you given much thought to a WordPress management tool? Look into something like WPBlazer, which can be added to your Lightsail install.