

How do you feel about getting interactive on your blog? Do you love it when people comment and then immediately engage them in further conversation? Or have you hit Google to search for how to disable WordPress comments because you cringe every time you get comment notification, wondering what kind of madness you’ll have to deal with?
Since you’re here, I’m guessing you may be in the second group. Or maybe you just have a specific category or post you want to disable WordPress comments for.
Regardless, whatever your reason for wanting to disable them, we’ll cover it here.
First, let’s discuss some of the practical reasons you might want to disable WordPress comments.
But before I do, I should mention there are valid reasons for maintaining a comment section as well. Accepting and replying to comments is a great way to engage your audience. And an engaged audience is an audience that returns for more. And there’s a good chance you want that, especially if your blog is somehow monetized.
So as you go through the variety of steps below on disabling WordPress comments, keep that in mind.
Table of Contents
1. Why Disable WordPress Comments
2. How to Completely Disable WordPress Comments
3. Disable Comments by Category
4. Disable Comments on Specific Posts & Pages
5. Disable WordPress Comments on Multiple Posts or Pages
6. How to Disable WordPress Comments on Media Attachments
7. How to Delete All Existing WordPress Comments
1. Why Disable WordPress Comments
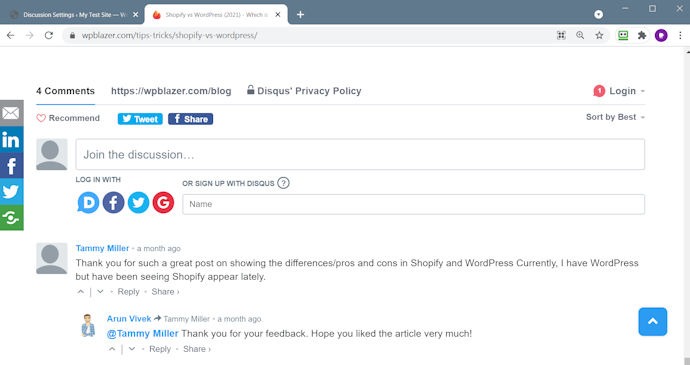
Source: WPBlazer
Above is a screenshot of your typical comment section. Sometimes the comment section is pretty tame. Sometimes it isn’t.
One common reason for disabling WordPress comments is something I alluded to above. Fear of the crazy people who roam free on the internet. For some reason, there exist trolls who love to anonymously stir things up. And then you find yourself in a moderation nightmare. Or spending all your time deleting comments one at a time. So much easier not to get them in the first place, right?
There are other reasons, though. If you are a small, one-person business, you probably don’t have the time for moderation. Or maybe handling customer service requests or complaints on your blog. You may have another way for your customers to connect with you and blog comments aren’t it.
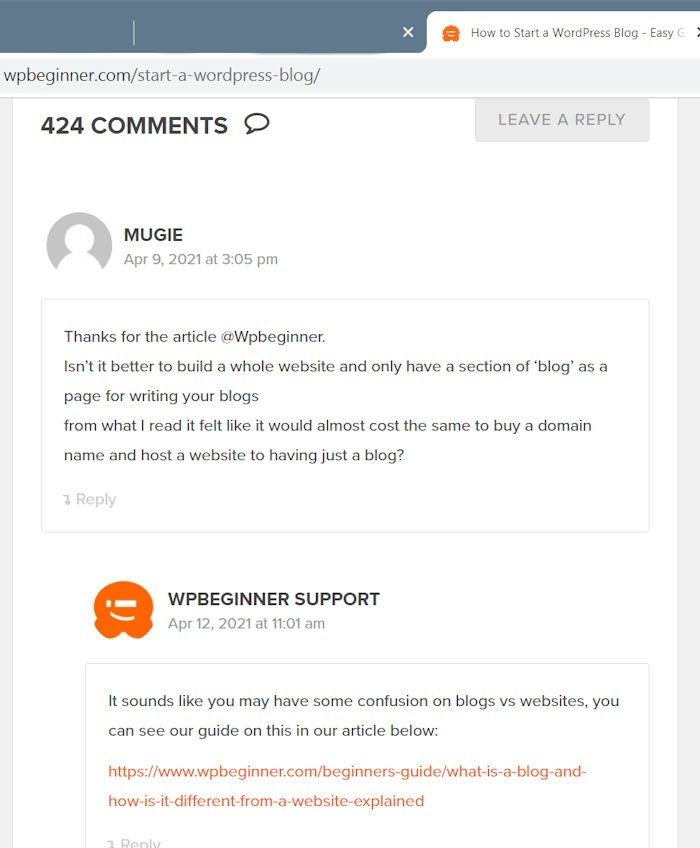
Source: WP Beginner
Or maybe you just can’t deal with all the spam comments, even though you’ve done your best to protect yourself from them. Trust me, that right there is a very valid reason to disable WordPress comments.
Here’s another reason. Maybe you have specific posts that aren’t meant for interaction. Maybe some sort of announcement.
Frankly, there are a lot of reasons why users might want to disable WordPress comments on their sites. So let’s get into the different ways you can do just that.
2. How to Completely Disable WordPress Comments
If you are just starting your blog, it’s a good thing to decide in advance if you want to disable WordPress comments. That way, you don’t need to worry about backtracking and to deal with comments users have already left.
Head to your WordPress dashboard and then scroll down until you find Settings in the left sidebar menu. From there, you want to open the Discussion settings.
Dashboard > Settings > Discussion
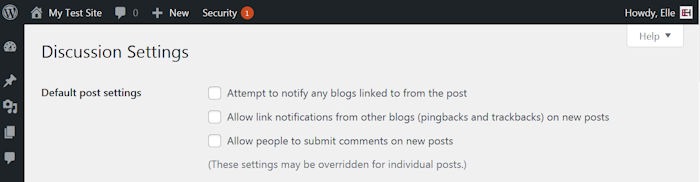
As you can see, you have a few options here.
If you want to go nuclear and allow no one at all to comment, make sure all three of those boxes are clear of a checkmark.
But before you do that, you might want to give it some thought because you may want to reconsider and check box 1 and or 2.
Let me tell you why.
The first box, Attempt to notify any blogs linked to from the post, if checked, will do exactly that. And if you have peers or authorities in your niche that you link to in your posts, it might be a good idea to ping them. If they have the second box checked, Allow link notifications from other blogs (pingbacks and trackbacks), assuming they use WordPress too, they will be notified.
If you are trying to build a reputation or establish authority in your niche, this could be a very good idea.
Now if you have the second box checked on your blog, this means if someone else links to you from their WordPress blog, you will know about it. And so will your readers, since a comment will show up in your comment section referencing it. Again, this might be a good way to show you have enough authority in your niche for someone to link to you.
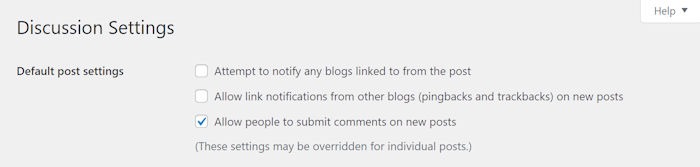
That very last check box, Allow people to post comments on new articles, is the box you want to check if you truly don’t want anyone commenting on your blogs at all. So if that’s the case, you should have discussion settings that look like the following.
But as I mentioned above, maybe you don’t want to disable WordPress comments across your entire blog. What then? Well, you do have some alternatives.
3. How to Disable WordPress Comments by Category
Perhaps you do want to encourage commenting on your blog but have a category that’s simply for announcements. Or anything. It really doesn’t matter, it’s just a category where you want to have your say and be done with it. So disabling WordPress comments sitewide wouldn’t be the answer.
The answer would be to disable comments for that category alone. There are a few ways to accomplish this. For those not uncomfortable with adding code to your functions.php, I’ll provide a snippet.
However, please note that while this appears to work under legacy WordPress version 4, this disable WordPress comments snippet may not work in version 5, Gutenberg.
Just in case you’re new(er) to WordPress, I’ll detail the steps. If you know how to find your functions.php, feel free to skip ahead.
Step 1. Find your functions.php
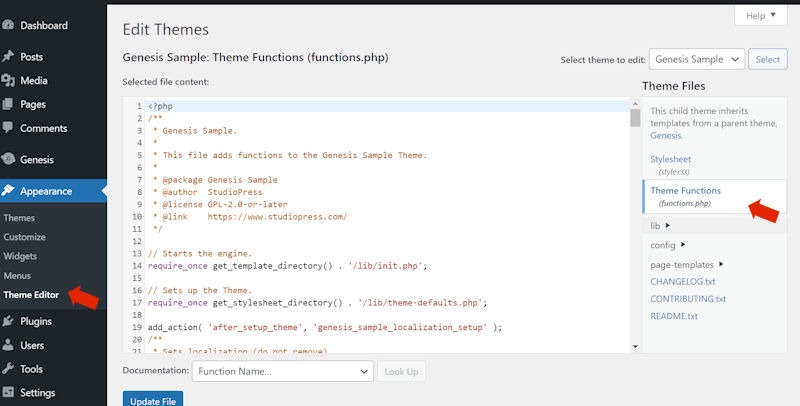
Your functions.php can be found in your WordPress theme folder. Go to your:
WordPress dashboard >Themes >Theme editor and then select the functions.php file on the right menu under Theme Files.
Before you make any changes to your functions.php—or any of your core files, for that matter—please be sure to take a backup. I recommend using the backup feature of WPBlazer.
Step 2. Insert the following snippet.
Once that is done, scroll down to the bottom of the file, add the following snippet, and then click the update button.
add_action( 'the_post', 'st_check_for_closed' );
  function st_check_for_closed()
    {
    global $post;
    $my_post_cat = wp_get_post_categories($post->ID);
    $disabled_cat = array( "1", "3"); // this is he array of disabled categories. Feel free to edit this line as per your needs.
    $my_result = array_intersect($my_post_cat,$disabled_cat);
        if (empty ( $my_result ) )
                      {
            return;
                       }
         else {
               add_filter( 'comments_open', 'st_close_comments_on_category', 10, 2 );
               add_action('wp_enqueue_scripts', 'st_deregister_reply_js');
             }
    }
          function st_deregister_reply_js()
        {
        wp_deregister_script( 'comment-reply' );
        }
      function st_close_comments_on_category ($open, $post_id)
        {
            $open = false;
        }
Source: TheWPHosting
Now there is one more step. You need to update the IDs for the categories that you want to disable.
Step 3. Find your category IDs
Look at what you just added and find $disabled_cat = array. You’ll see that categories 1 and 3 are there, and unless you are incredibly lucky, those will need to be changed to your own IDs. How do you find your IDs, you ask?
I’ll show you.
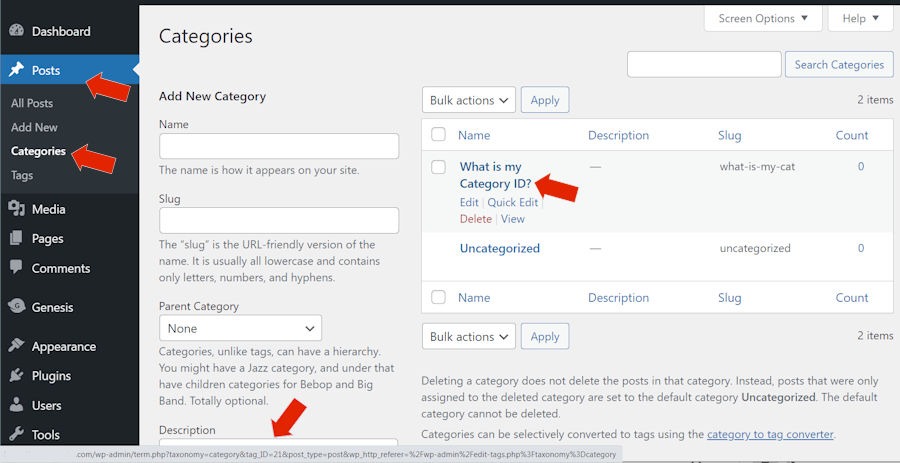
Head to your WordPress dashboard again. So you don’t lose your current spot, I suggest you open a new tab on your browser to do this. Then go to your dashboard and find >Posts >Categories.
When you get to your categories page, head over to the right where your list of category names is, then hover your mouse over the name of every category for which you want to disable WordPress comments. As you hover your mouse over the name, a URL address should appear at the bottom bar of your browser. It’s at that address that you will find your category ID.
It will look like category&tag_ID=21. The ID of the What is my Category ID I created in the screenshot below is 21.
Now go through your categories and find each of those numbers. When you have them all, head back to the browser window you still have open to your functions.php.
Step 4. Add your category IDs to your functions.php.
If you want to make another backup at this point, feel free to. If you’re confident the previous backup is sufficient, start plugging those IDs in, making sure to delete the 1 and 3 that are already there, and adding a comma between each new addition. Just make sure you don’t delete the quotation marks as well.
Once that’s done, save your changes.
Now any post that belongs to a disabled category won’t have a comment section below it.
4. How to Disable WordPress Comments on Specific Posts & Pages
Perhaps, for the most part, you’re okay with the status quo and don’t want to disable WordPress comments site-wide or even category-wide. But there may be the occasional post that you’d rather not get feedback on. So what do you do then?
There is a simple answer to this.
Every time you create a new post in WordPress, you have the option to turn off comments for that specific post.
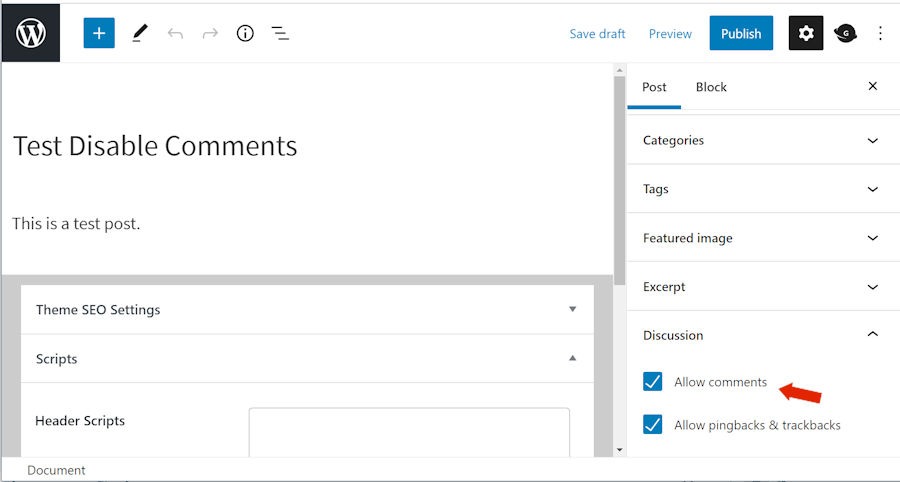
You can see the check box when you scroll down to the bottom of the menu on your right when adding or editing a post.
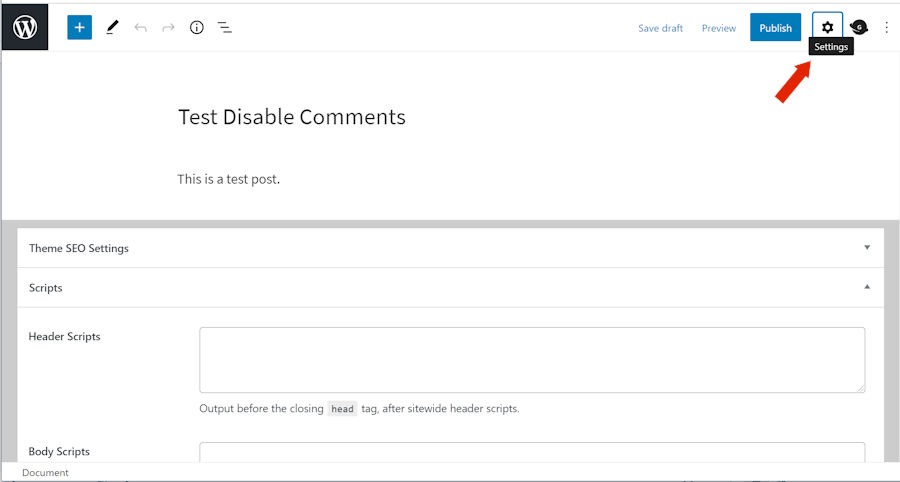
If you are on your post page and it looks like below, without a right sidebar menu, you just need to activate it. Head to the settings icon in the top right corner. Once you open that, simply scroll down and you will find the option to check or uncheck comments for the specific post.
And what about pages? It isn’t often we want comments on pages, so WordPress has them turned off by default. If you do want to have comments on a specific page, simply follow the same steps I laid out for turning them off for a post and turn them on.
But what do you do if you want to make these kinds of changes when you’re already deep in your blog with lots of posts and pages? Do you need to go through and disable WordPress comments on each post and page individually? No, fortunately not.
5. Disable WordPress Comments on Multiple Posts or Pages
Changing this is a fairly simple process. You have the option to handle several changes in bulk and the ability to disable WordPress comments is one of them.
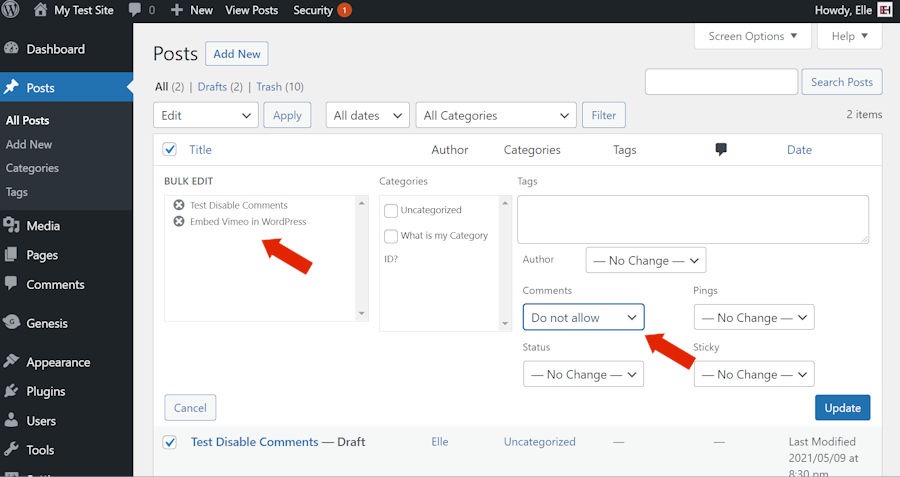
Head to your dashboard and select Posts > All Posts. From there, choose Edit in the first pulldown menu, check the box that selects all of your post titles, and then choose Apply.

Once you hit apply, you will open the bulk edit interface. Here you are presented with multiple options. First, I suggest you take a look at all the posts in the top left and make sure you do want to apply changes to all of them. If not, you can just cancel them out.
From there, just find the Comments option, which will likely have “No Change” selected. Go ahead and change that to Do Not Allow.
And just like changing individual posts applied to pages as well, you can also follow these steps to disable WordPress comments on your pages in bulk.
Now, what if you want to get even more granular with your disabling options? You can do that. In fact, you can even disable WordPress comments on media.
Here’s how.
6. How to Disable WordPress Comments on Media Attachments
As I’m sure you can guess, there could and would be times you really don’t need to have comments enabled for each piece of media you share on your posts. Thankfully, there are a few ways to deal with that.
First up, another code snippet. And like before, I’m going to remind you to do a backup before making any changes to your core files. And again, I’m going to recommend WPBlazer. You may want to put your site in maintenance mode as well.
This snippet will go in your functions.php. You can find that via your dashboard then Appearance >Theme Editor.
Select your functions.php in the right menu and then add the following to the very end, and hit update when you are done.
function filter_media_comment_status( $open, $post_id ) {
$post = get_post( $post_id );
if( $post->post_type == ‘attachment’ ) {
return false;
}
return $open;
}
add_filter( ‘comments_open’, ‘filter_media_comment_status’, 10 , 2 );
Source: GreenGeeks
And that’s it. The option to leave comments on media will no longer be available.
All these steps are very helpful in stopping future comments, but what if you’ve already got a lot of comments on your blog and you’re making a change. It might be better to have continuity. Not a bunch of older posts with comments that just might lead visitors to wonder why the option is suddenly gone.
You can solve that by deleting all of your old WordPress comments.
7. How to Delete All Existing WordPress Comments
To do this, head over to your dashboard and select Comments. In the first pulldown menu select Move to Trash. Then select Apply right beside that.
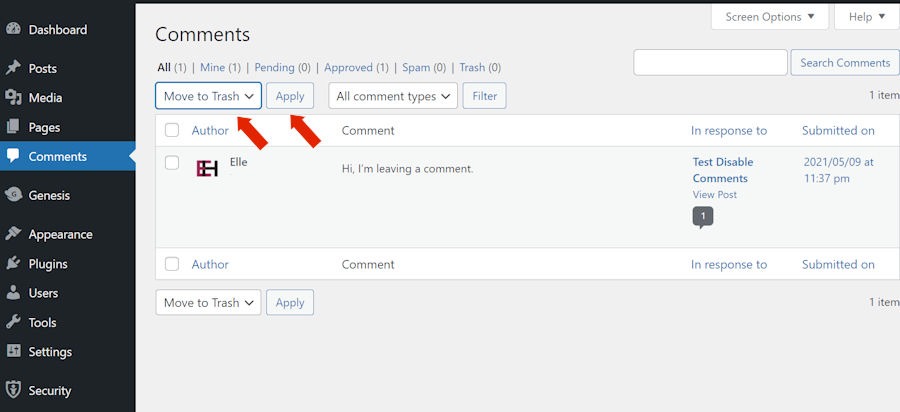
This step will remove all the comments to trash, but it might need to be done more than once, depending on the number of comments you need to delete.
Wrapping it Up
So did you decide to disable WordPress comments sitewide, or did you finally decide it might be in your best interests to maintain at least a few sections of your blog where you can engage your audience?
You’re the one who knows what’s best in your particular situation. And if you have decided that yes, it is the right choice to disable WordPress comments and perhaps even delete all the comments you’ve received to date, you have all the steps to do so.
And if one of the reasons you are making this move is because time is of the essence, then why not try something that is saving many other WordPress site owner’s time. WPBlazer is a tool that can automatically manage WordPress tasks for you.