When was the last time you look into your DNS configuration? Surprisingly, most look into DNS configuration once – when they buy their domain name. Yet, it can have a huge impact on their site’s performance and user experience. In this WordPress DNS Configuration guide, you’ll see how to point your DNS to a new server (and what’s the best way to do that). You’ll also discover why using your domain provider’s DNS is not a good idea... and why poorly set DNS of others can affect your website!
Table of Contents:
1. What Is DNS – And Why It’s So Important?
2. Different Ways to Configure Your WordPress Site's DNS
Pointing Your Domain to Server DNS
Pointing Your Domain to Server IP
Using CNAME Records in Your WordPress DNS Configuration
DNS Propagation
3. Other Useful DNS Records
Setting Your WordPress DNS Configuration for a Subdomain
Verifying Your Domain in Google Search Console
4. DNS and Website Speed
The Impact of Your Visitors' Location
5. Caution: WordPress DNS Configuration and Caching
6. Reducing the Effect DNS Has on Your WP Site
Defer Loading of JavaScript
Use DNS Prefetching
7. Start Optimizing Your WordPress DNS Configuration
1. What Is DNS – And Why It’s So Important?
In technical terms, DNS stands for Domain Name System. Its role is to translate the domain name you type into an IP address. What does it mean? One nice comparison we’ve found online compared DNS to a big Internet phonebook. Imagine you want to go to YouTube to watch your favorite cat videos. Or visit Facebook.com to chat with friends, or look up some interesting articles over at Wikipedia.
Without DNS, you’d have to type in the exact IP address of the server that hosts each of those services. Imagine having to memorize dozens of strings of numbers just to browse the Internet!
Thanks to DNS, all you need to type in your browser is the domain address itself, like YouTube.com or Wikipedia.org. So, just like with a phonebook, you don’t have to remember the exact “phone number” (IP address). All you need to know is the name of the service you’re looking to access. And, unlike a phonebook, the searching part is done for you!
2. Different Ways to Set Your WordPress DNS Configuration
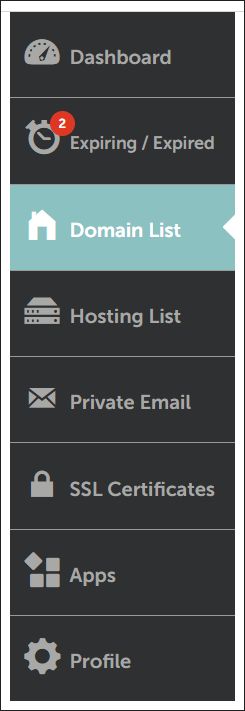
Now that you know why a domain name system is critical, let’s see how you can point your domain to a new server. This step is critical in setting your WordPress DNS configuration or any other site. After all, if your domain doesn’t point to your server, nobody will be able to access it. The most common way of doing that is pointing your DNS to your server in your domain name settings. You can find them in your domain name provider’s dashboard. In our example, we’ll use Namecheap.com. Once you purchase a domain, log in to your Namecheap account and select Domain List:
Then, pick the domain that you’d like to configure and hit Manage:

Here you can configure all the settings of your WordPress domain. In this guide, we’ll take a quick look at two possible scenarios. First, we’ll look at how to point your domain to a new server using your server’s DNS. Then, we’ll look at how to do that when all you’ve got is your WordPress website’s server IP or domain.
Pointing Your Domain to Server DNS
Once there, head over to Domain:

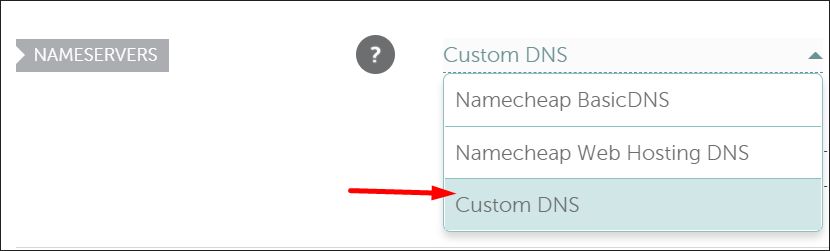
Then, scroll down to nameservers. There, you want to pick custom DNS so that you can point them to your WordPress website:
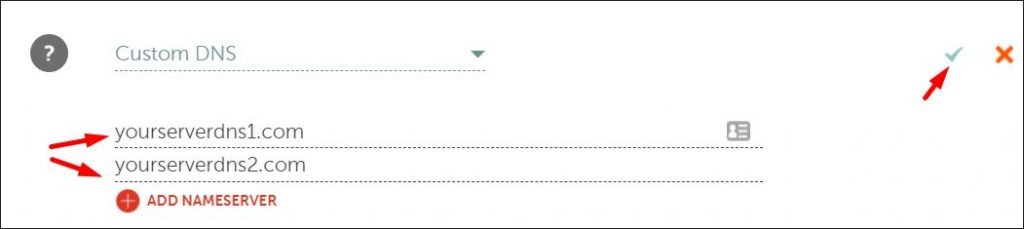
And then enter your WordPress server’s DNS into the two fields that appear. Don’t forget to click the green button – otherwise, the DNS won’t update:
Of course, you might want a different DNS configuration for your WordPress website. For example, you may point it to a WordPress CDN, such as Cloudflare, before pointing your domain to a server.
In this case, the first thing you need to do is update the DNS the same way we just did. But, instead of pasting your server’s DNS, you want to use the Cloudflare one. You can read more about getting Cloudflare DNS for your website in our WordPress CDN article.
Pointing Your Domain to Server IP
Sometimes, your server won’t give you DNS to use. Instead, you’ll only get the server’s IP address. In this case, your WordPress DNS configuration process will look slightly different.
Of course, your domain still needs to have DNS. Thankfully, Namecheap allows you to use their DNS when pointing to an IP address. To use them, you need to pick Namecheap BasicDNS in the nameservers menu:

Note: As you’ll find out later in this article, Namecheap BasicDNS is not always the best choice for your WordPress DNS configuration. Instead, we recommend that you use a faster solution, such as Cloudflare free DNS.
But, should you want to stay with Namecheap’s DNS for now, here’s the next step to pointing your domain to an IP address. While still in Namecheap’s domain management dashboard, head over to Advanced DNS menu:

There, you’ll need to add two new A records pointing to your domain. An A record allows you to link the domain directly to an IP address. We’ll need to set one for a naked domain (so a domain without a subdomain or www) and one for its www version.
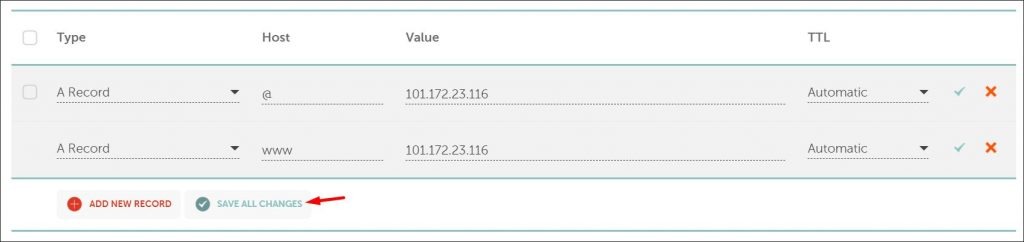
Let’s imagine your server’s IP address is 101.172.23.116 (it’s just a random example). To create an A record for that IP, click Add a New Record and select A record from the Type drop-down list.
Next, add @ in the host field (this tells the system it’s a naked domain) and copy-paste the IP address into the Value field. Lastly, you can configure TTL. For an A record, it’s OK to leave it as Automatic. After that, repeat the process – but this time, enter www into the Host field. Once done, your DNS settings should look like this:
Using CNAME Records in Your WordPress DNS Configuration
A records and DNS forwarding are popular ways of pointing your website to a server. But, they're not the only ones. If possible, you can also use a CNAME record. What’s the difference between a CNAME and an A record? Unlike an A record, a CNAME record doesn’t point to an IP address. Instead, it can point to a domain. Why you should pay attention to it when tweaking your WordPress DNS configuration?
Think of a situation where you use an A record to point your domain to your hosting provider’s IP address. While it’s not a common situation, should they move your website to a new server, it may become unavailable. At least assuming that server has a new IP, and until you update your A record. But, you’ll have to do that manually.
Now if that same hosting company was forced to change servers, an IP address change wouldn’t affect you at all. Because you are pointing to a domain, you don’t have to update anything. What's more, there’s no risk to your website’s availability. That’s, of course, assuming your hosting provider ensures the availability of your site during the switch.
Speaking of availability – while you can’t eliminate all the risks, you can reduce the losses. But, you need to act as soon as your website goes down. The key to doing that is to monitor your website’s availability. You can do that using a WordPress uptime monitoring plugin. In fact, uptime monitoring is one of the features included in WP Blazer’s plugin.
Now, let’s get back to setting up a CNAME record. Knowing how beneficial a CNAME record can be, how can you configure your WordPress site’s DNS to use it? Luckily, the process is almost the same as setting up an A record. Coming back to our Namecheap example, let’s head back to Advanced DNS settings.
There, you want to create a new record. But, instead of using an IP address, you’ll use an address provided by your host. Let’s assume your host asked you to create a CNAME record for server1.coolhosting.com. In this case, the CNAME record would look like this (don’t forget to click the green button to save changes!):

DNS Propagation
What if you’re 100% confident you’ve set your DNS configuration right, yet you can’t access your website? There's no need to worry - your DNS may need some time to propagate. Most of the time, you'll be able to access them in a few minutes.
However, keep in mind it may take up to 24 hours for the change to take place. You can double-check your DNS using a DNS Checker.
3. Other Useful DNS Records
Knowing how to configure your DNS allows you to do a lot more than just point your domain to a new server. For example, what if you want to add a subdomain? Or verify your website inside Google Search Console? In both cases, you’ll need to edit your DNS settings. In fact, let’s see how you can do exactly that.
Setting Your WordPress DNS Configuration for a Subdomain
For Namecheap, you can edit your subdomain DNS settings inside Advanced DNS. But, the A record that you’ll create is the same no matter what DNS your domain is using.
If your subdomain points to the same server as the main one, the only difference will be in the Host field. Instead of “@”, enter your subdomain name. The rest should stay the same. For a subdomain named blog, the A record will look like this:

Of course, if your host gave you a domain and not an IP, you’ll want to use CNAME instead.
Verifying Your Domain in Google Search Console
Now, let’s look at how you can verify the ownership of your website in Google Search Console. To do that, you’ll be asked to add a TXT record to your WordPress DNS configuration. A TXT record is used to sort certain text information in your DNS configuration. Whenever you try to add a domain, you’ll see something like this:
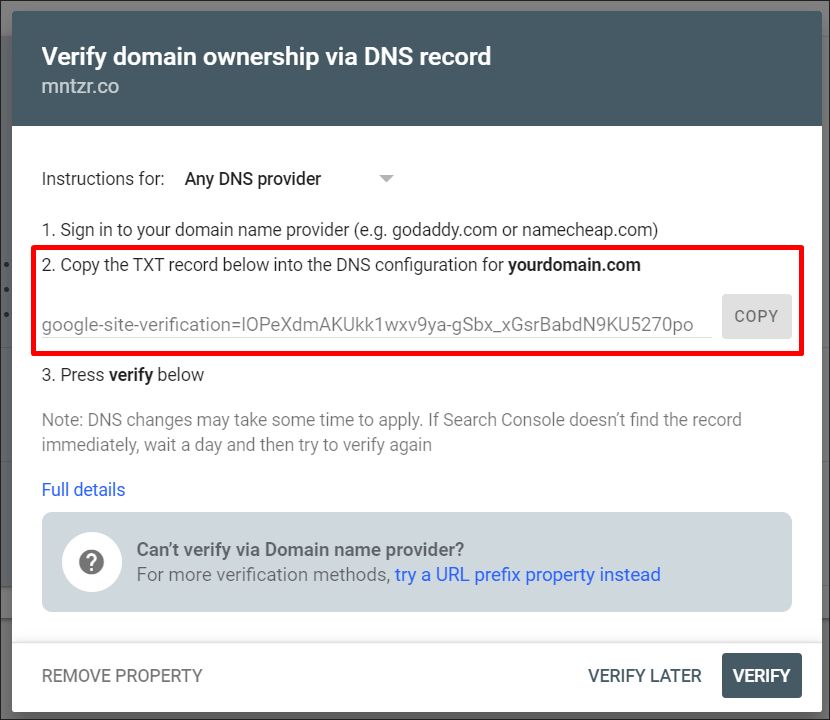
To verify domain ownership, copy the TXT record and add it right next to your domain’s other records. If you’re using Namecheap, it’ll look something like this:

Keep in mind that, once you add the txt record, you might have to wait for Google Search Console to see the change.
4. DNS and Website Speed
What’s important to note is that DNS is more than a tool to point your domain to an IP address. The DNS that you use can impact how fast your domain name can be accessed. . Take a look at the following comparison made by dnsperf.com.
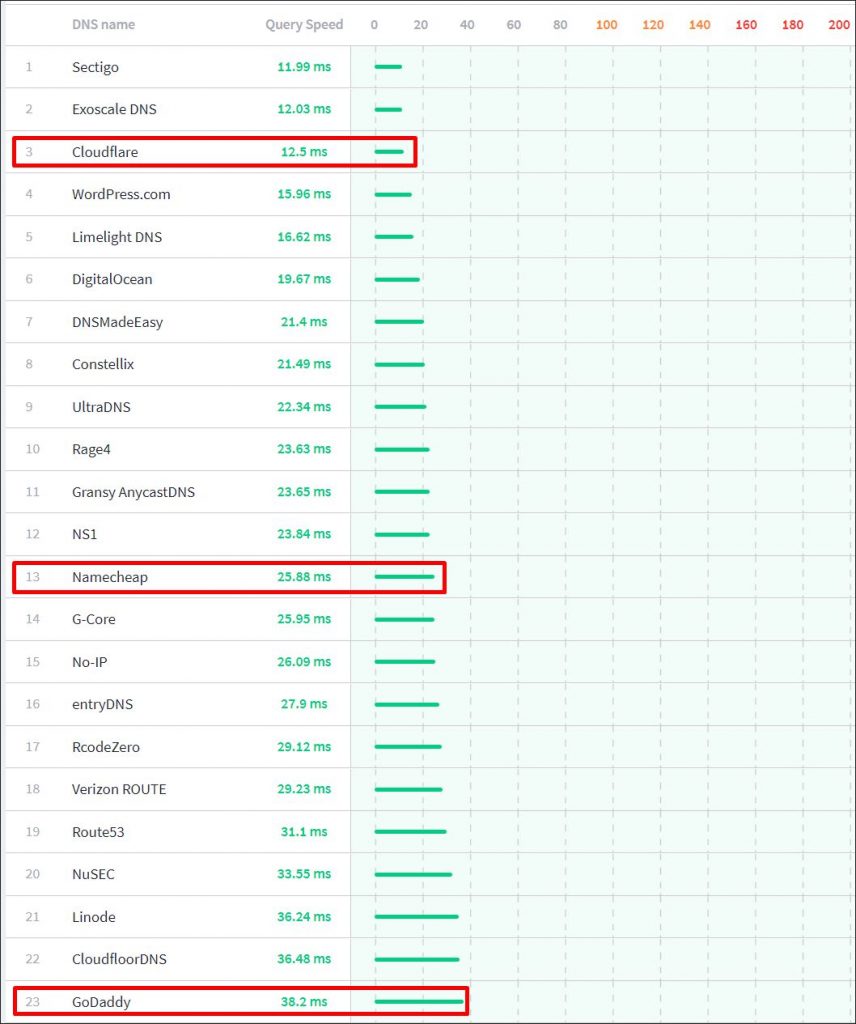
As the data shows, the querying speed of DNS at Cloudflare is over three times lower than that at GoDaddy! Of course, the time difference in nominal terms doesn't make much of a difference for the average user. The reason is, a DNS lookup is performed only once per domain. But, it’s still something to look at when setting up the DNS configuration of your WordPress website. At the end of the day, all the little delays quickly add up. And, as we all know, WordPress isn't blazing fast out of the box, so it's best to help it as much as you can.
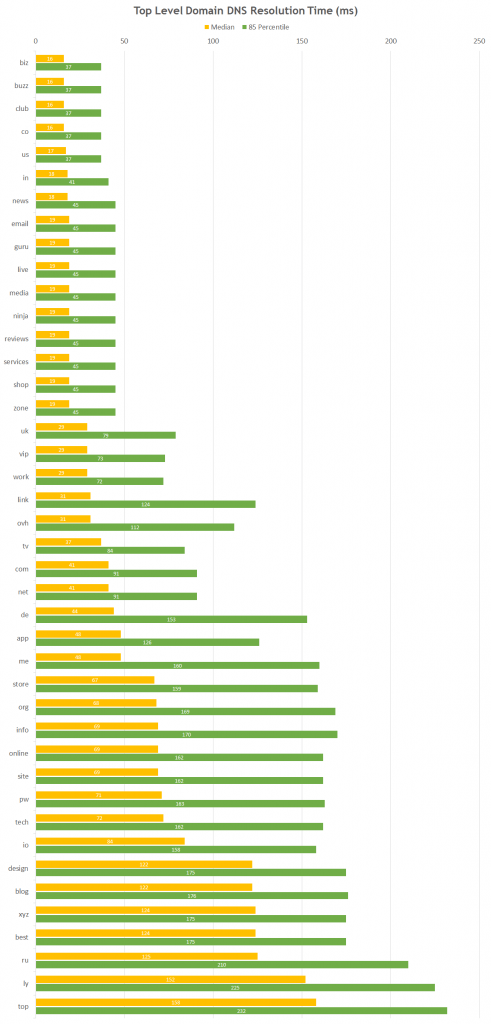
Interestingly, even your TLD has an impact on your DNS resolution time. Based on research by BunnyCDN, a .biz domain DNS response is almost 3x faster than that of a .com domain. What’s even more interesting is that certain TLDs are almost 10x slower than the fastest one! Of course, we don’t necessarily recommend that you switch your domain TLD just to shed a few ms. But, should your project ever need extremely low resolution time, it’s worth keeping that data in mind.
The Impact of Your Visitors' Location
One extra thing you might want to consider is where your visitors are coming from. If your audience is world-wide, pointing your DNS to a good CDN helps reduce website loading time.
Of course, it’ll all depend on where your visitors come from and the nature of your content. Still, a content delivery network is a solid way to reduce DNS lookup time. Not to mention it can greatly reduce server load and increase overall website speed.
5. Caution: WordPress DNS Configuration and Caching
When you’re using DNS provided by a CDN company such as Cloudflare, you may come across some caching issues. While it’s nothing that could break your website, it may make your life a little bit harder than it should be.
For example, consider a scenario where you’ve just added some small changes to your website. You then proceed to reload your site to test them and see how they look. And, as they were minor, you didn’t use a staging environment, and, instead, worked right in production.
On top of that, you’re using a WordPress caching plugin such as WP Super Cache. You flushed WordPress cache, yet you still can’t see the changes. Why? The reason is Cloudflare’s own caching.
Unfortunately, making (and seeing) small changes requires you to flush all caches each time you edit your website. Still, if your current DNS is slow, your WordPress DNS configuration will benefit from switching to a faster provider.
6. Reducing the Effect DNS Has on Your WP Site
In one of the previous sections, we said that your main domain DNS is only looked up once. But, what if accessing your website loads content from multiple different domains?
Just think of all the different things that load whenever your site does. Fonts, social media plugins, ads. Analytics and tracking. All the different scripts often point to their respective domains. And, as the number of lookups goes up, they can really slow down your website. Of course, removing the scripts that point to external domains would seem like the best thing to do. But, that’s rarely possible.
After all, you can’t really resign from tracking. The same goes for finding faster alternatives. There are tools you absolutely have to use. Luckily, while there may be DNS lookups you can’t get rid of, there’s a way to reduce their impact on your website. Here are two ways to do that:
Defer Loading of JavaScript
While you may not want to remove certain scripts, that doesn’t mean you can’t… make them load a little bit later! And the beauty of it is, you don’t need any coding skills to do that. As is the case with WordPress, all you need is a WordPress plugin.
In fact, most caching plugins, such as W3 Total Cache Plugin, come with the option to defer the loading of JavaScript already built-in. You can also use a plugin built specifically to do that, such as Async JavaScript.
Use DNS Prefetching
The second thing you can do is to implement DNS prefetching. Doing this allows the visitor to perform lookup on a domain in the background. While this requires you to add a little bit of code to your website, it’s a very straightforward procedure.
For example, what if you want to use DNS prefetching on Google Analytics? In this case, all you need to do is add the following piece of code to your site’s header:
There are several ways to add code to your site’s header. The most basic one is to go to Appearance > Theme Editor:
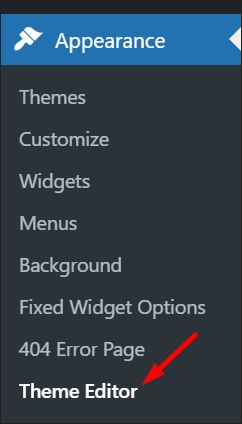
Then, find header.php and paste the code before the tag:
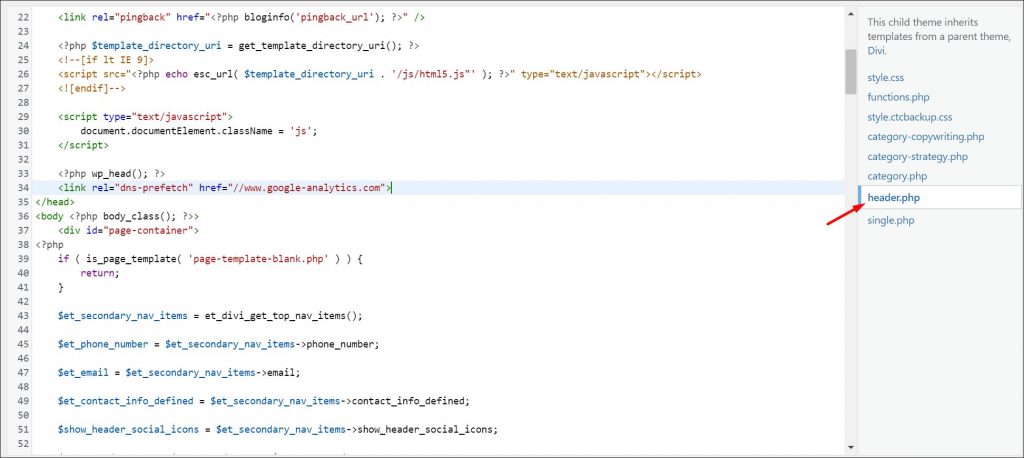
The problem with this method is that there’s always a risk of breaking the code. Plus, if you’re going to edit your theme’s code, we always recommend using a child theme! Not only it’s safer, but you don’t risk losing the changes should theme developer update the theme.
A much safer way to add code to your site’s header is to use a special plugin such as Head, Footer and Post Injections. That way, you don’t have to dig into the code itself.
7. Start Optimizing Your WordPress DNS Configuration
Now that you know how to speed up your own DNS, and reduce the number of DNS lookups, it’s time to take action. Whether you choose to switch to Cloudflare DNS or defer JavaScript loading, these little changes will quickly add up. And, the faster your website – the better its UX, and the happier your website visitors.
Of course, don’t forget that even the fastest DNS won’t help you if your site goes down. In this case, the sooner you get into action and start fixing things, the lower the losses. To start monitoring your site’s uptime, head over here and start WP Blazer’s 14-day trial. And, the beauty of it is, you can monitor multiple sites at once!