

Why doesn't WordPress show my updates? Where are my changes? If you're new to WordPress and spend a lot of time updating content or coding, you're bound to experience minor problems that prompt questions like these. The good news is you can fix these problems (and answer the questions) when you clear WordPress cache.
What kind of problems are caused by a wonky cache? Typically, you might experience these issues:
- can't seem to save changes
- WordPress displays out of date information even though you save changes
- your website looks different on another computer
As panic sets in, you might act irrationally. You open a ticket with your hosting service and then scan the web for answers. In many cases, the first and best response is this: did you clear your WordPress cache?
In this article, you learn how to restore WordPress functionality by clearing the cache.
To understand the problem and solution, we cover three topics:
- what is cache and why it's a valuable tool
- how to clear browser cache (client-side cache)
- how to clear WordPress plugin cache (server-side cache)
1. What is cache?
Cache (sounds like cash) is a temporary storage area for data. Basically, the cache stores a static version - or snapshot - of your website pages. Here's the problem: pages often change, so the old static version is out of date if the cache does not refresh with the current version.
To understand the importance of cache, consider how websites display images and text on your monitor. In simple terms, the website page you see is created when a browser pulls together bits of HTML, CSS, and JavaScript code along with assets in the WordPress database (e.g. text and images). In order to speed up this creation process, websites pre-assemble some of the files. These files - called a static site - are stored in the cache.
When you return to a website, your browser quickly displays a page by bringing up the static site. A static site is one important factor that influences overall site performance. If we didn't cache files, users might not be willing to wait around more than two seconds, the oft-quoted upper limit of patience for online viewers.
Thanks to the cache, our sites load in milliseconds. Occasionally, files in the cache don't refresh. That's when you experience those nuisance problems we mentioned at the top of this article.
In most cases, you can solve those problems by deleting files in the cache - called clearing the cache. There are many types of cache. We describe two cache solutions.
2. Clear your browser cache
The first -- and often best -- solution is to clear your browser cache. It's easy to do. Do note, however, this is a local, client-side fix. If the cache problem is causing problems for other people - this solution might help you but not other website visitors.
Many browsers use cache to store content (e.g. images and CSS code) for sites that you frequently visit. Sometimes, the cache does not detect changes to the original site. In these cases, the browser loads old content instead of the latest version.
Different browsers require a slightly different approach. This article shows you how to clear the browser cache in Chrome and Firefox.
Chrome cache
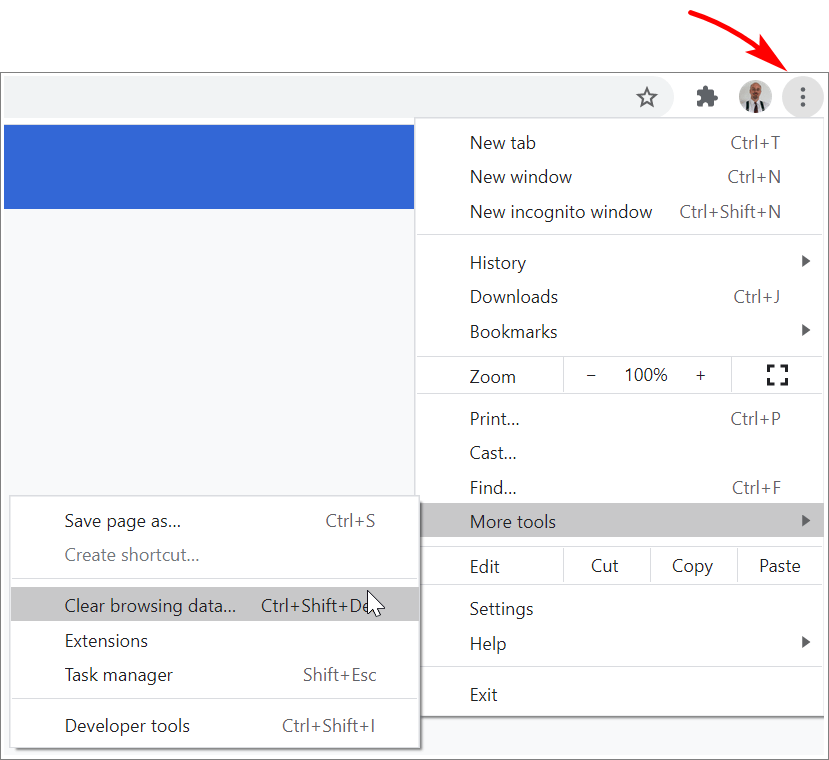
- Click the 3 dots in the top right corner of the browser.
- Select More tools > Clear browsing data.
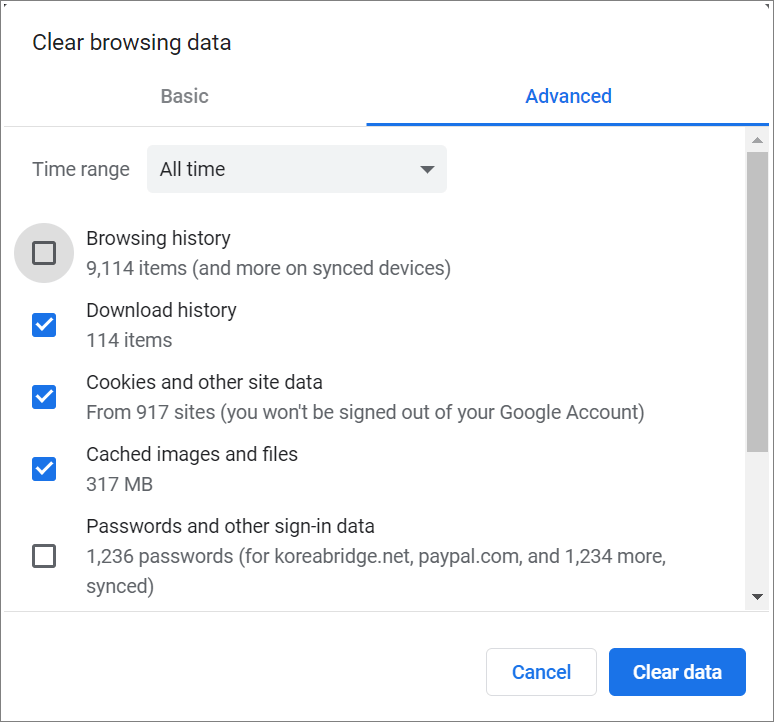
- A popup box displays several options. Click the Advanced menu tab and then select the data you want to delete. Be sure to check the boxes for Cookies and other site data and Cached images and files. You probably want to keep your browsing history and passwords.
- Click the Clear data button.
You have now cleared the cache in Chrome. Try loading your website.
Firefox cache
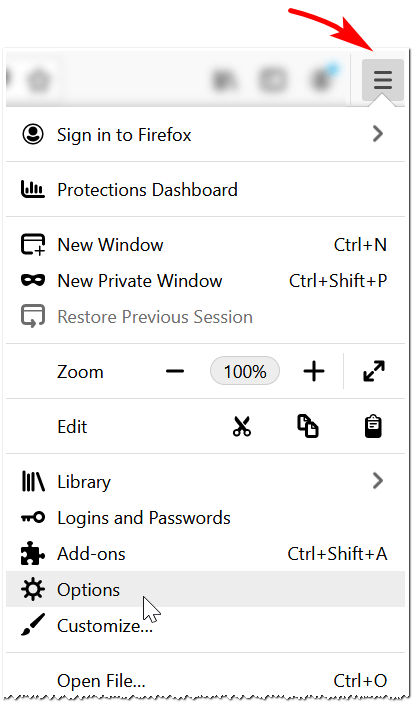
- Click the hamburger button in the top right corner of the browser and then select Options.
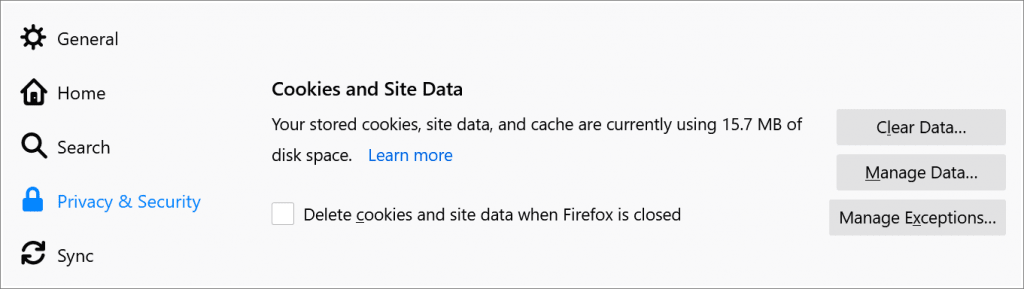
- On the next page, click Privacy & Security.
- Scroll down the page to Cookies and Site Data.
- Click Clear Data.
You have now cleared the cache in Firefox. Try loading your website.
3. Clear plugin cache
If your problems appear on multiple devices, a client-side solution won't be sufficient. The next step is to clear the data in your WordPress site's cache plugin - if you have one.
What's a caching plugin?
It's a WordPress tool that creates a static site and saves it on your server. That's why it's called a server-side cache.
When someone visits your site, the plugin throws up the static page. This is good for you and your users because pages load fast. That improves the user experience and lowers the risk of getting a Google SEO penalty for running a slow site.
Many -- but not all -- WordPress site owners use a caching plugin. Some hosting services do not permit this type of plugin because they already provide server-side caching.
There are heaps of caching plugins on the market, both free and freemium. Here's how you can clear the WordPress cache if you use one of these two popular plugins.
W3 Total Cache
This free, open-source plugin has more than a million downloads and a stellar rating. Unlike some open-source plugins, it's feature-packed though a bit unwieldy - you need time to set it up properly. One good point is that it gives you the ability to control several types of cache (e.g. page, object, and browser).
Clearing the cache files, though, is easy enough.
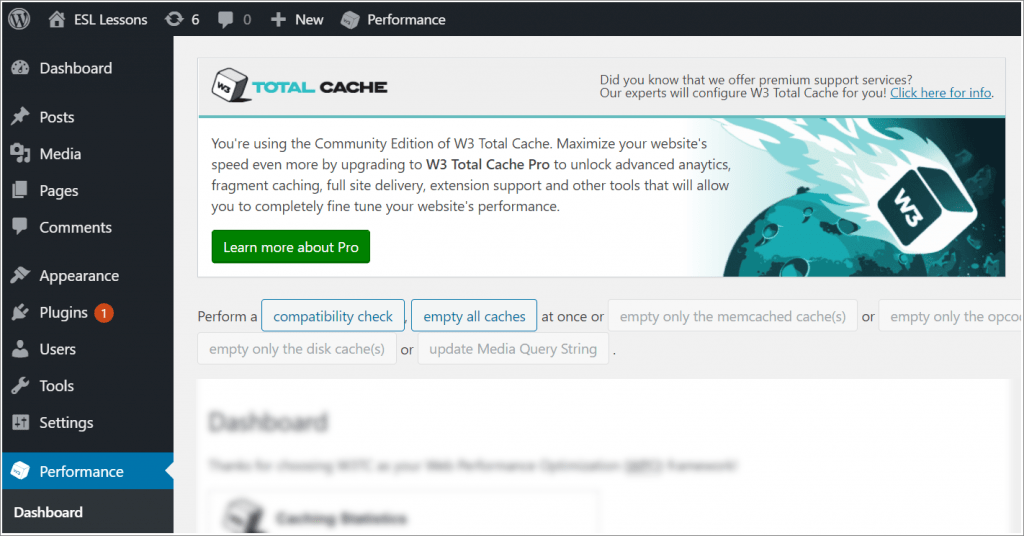
- Click Performance > Dashboard on the WordPress admin menu.
- Click the empty all caches button on the TOTAL CACHE dashboard.
Your WordPress cache is now clear.
WP Super Cache
With more than two million active installations and frequent updates, it's a solid choice if you're looking for a free WordPress caching plugin.
One potential downside is that you might need to complete a few extra steps on the back-end to properly uninstall the plugin. Just clicking the deactivate button might leave some messy files behind that could muck up your site.
Clearing the cache, though, is simple.
- Click Settings on the WordPress admin menu.
- Click WP Super Cache.
- On the WP Super Cache Settings page, click the Delete cache button.
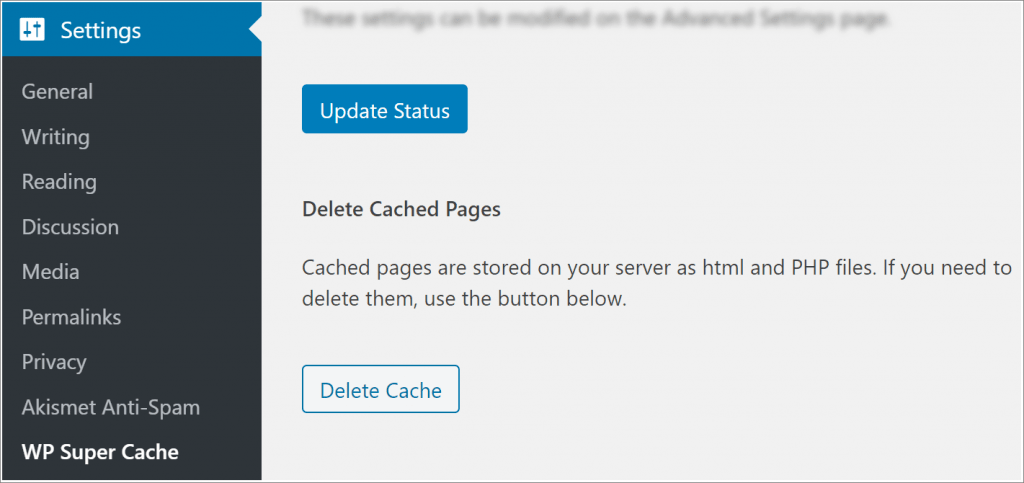
- On the next page, click the Delete Cache button.
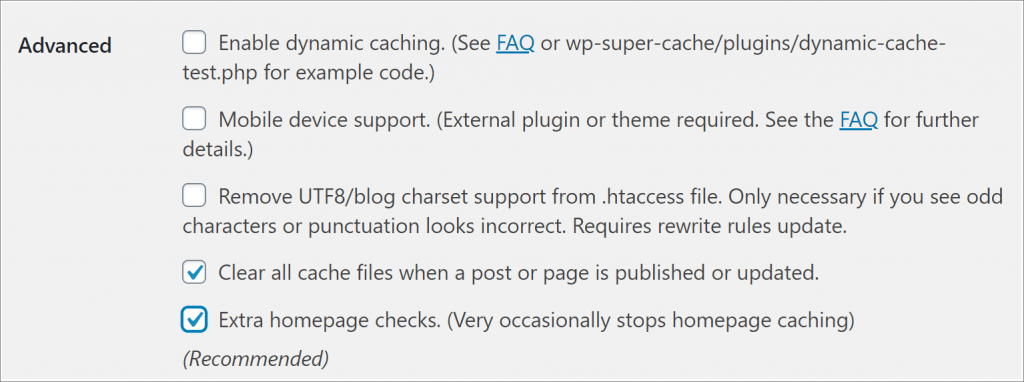
If you're ready to take advantage of its super-charged features, click the Advanced menu tab at the top of the screen, scroll down to the Advanced section, and check two boxes. Both features help to automate cache clearing.
- The first box is Clear all cache files when a page or post is published or updated.
- The second box is Extra homepage checks.
By default, these settings are not activated.
Wrap Up
If you're new to WordPress, clearing the cache is a useful skill. It might not solve all of your WordPress problems, but it does help you work more efficiently - and reduce the number of tickets you send to your hosting service.