

Keeping your WP themes and plugins up-to-date is one of the keys to keeping your site secure. The problem is, not all WordPress website owners know there are a few more things they need to keep up-to-date. One of such things is your server’s PHP. In this guide, we’ll take a closer look at how to update PHP in WordPress (and why you should do that).
Table of Contents:
1. What Is PHP?
2. Why You Should Update Your WordPress PHP
It makes your website more secure
Your website becomes faster
You Get an SEO Boost
You need to Update PHP in WordPress to receive support
3. Checking Which PHP Version You’re Running
Important: Which PHP Version Should You Update to?
4. Before Updating PHP in WordPress: Backup Your Site!
5. Updating PHP version in Different Control Panels
Updating WordPress PHP If You’re on cPanel
Updating PHP If You’re Using Plesk
Updating PHP When Using CentOS Web Panel
6. After Updating: Do the Testing!
7. Update Your WordPress Site’s PHP Now
1. What Is PHP?
PHP (an acronym for Hypertext Preprocessor) is a popular server-side open-source scripting language. It’s used to develop dynamic, interactive websites. Since it can be embedded into HTML, it makes adding new functionalities to websites easy.
While its popularity has been on a slight decline, it’s still used by close to every 4 in 5 websites. That number includes all WordPress sites. In fact, PHP is the "engine" powering every WP-based website. As such, it’s an essential element of every WordPress-friendly hosting. Of course, it powers other websites too! PHP is platform-independent, boasts a huge community, and has been around for 25 years.
During all that time, it received numerous critical updates (and still does). Because of that, you need to make sure that your WordPress website is running on a server with an up-to-date PHP. Here’s why..
2. Why You Should Update Your WordPress PHP
Since PHP is the engine that powers your website, it makes sense to take care of it. Especially that keeping your WordPress PHP updated comes with several important benefits:
It makes your website more secure
There are a few reasons to update your PHP - but security is definitely #1. WordPress isn’t just the most popular platform for bloggers and entrepreneurs. It’s also popular among hackers, who keep looking for PHP bugs to access your website.
By keeping PHP secure, you “close off” many routes they could use to try and break into it. Updating PHP takes several minutes. The cost of lost revenue or a tarnished reputation in case of a security breach is hard to imagine.
Your website becomes faster
New PHP versions improve your server (and, as a result, website) performance. Each PHP version is more efficient at running processes. It does it faster and requires fewer resources.
For example, PHP 7.0 is regarded as a major performance breakthrough compared to its 5.X predecessors. But, even minor updates can bring huge performance differences. For example, PHP 5.1 more than doubled the performance of version 5.0.
Of course, the jump in your site’s performance might not be as drastic as that measured by PHP benchmarks. Still, as we explain in the next section, every second counts.
You Get an SEO Boost
Website speed is not just about trimming down the numbers. Even more important is that the faster your website, the more it is loved by your visitors.
If your website is fast, they find it more convenient to browse and stay on it longer. This, in turn, has a positive impact on your search engine ranking. In fact, your website has to be blazing fast if you want to compete for the top spots.
Another added benefit of that performance boost is that your site uses fewer server resources. This helps cut down your hosting costs. And the more visitors you get, the bigger the savings.
You need to Update PHP in WordPress to receive support
As new versions of PHP get tested and gain in popularity, developers stop supporting the old ones. If you don't update PHP, your WP site will lose compatibility with certain themes and plugins. And, even if you can still run them on old PHP, their performance is not supported. As a result, there’s no guarantee they’ll work correctly.
Running plugins and themes on an old PHP version could lead to bugs and performance drops. This, in turn, could affect your site’s UX, reduce its security, and even affect your SEO ranking. After all, poor UX will make many of your site’s visitors leave your site early.
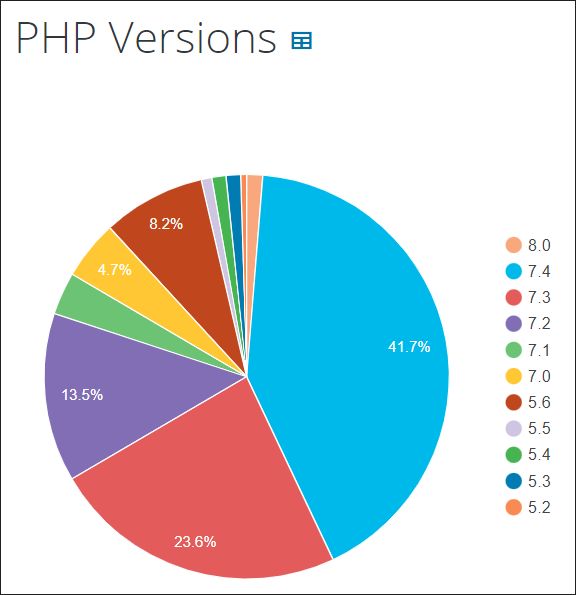
Because of that, both WordPress and WooCommerce don’t support sites running PHP 7.4 or lower. Interestingly, despite that lack of support, just 43% of WordPress websites are hosted on a server with PHP 7.4+. Out of those 43%, 41.7% are running version 7.4 and 1.3% version 8.0.
3. Checking Which PHP Version You’re Running
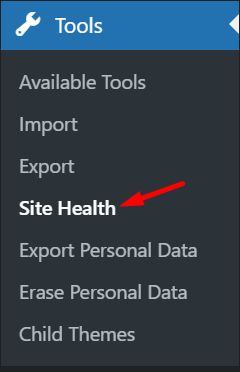
When we discuss how to update PHP in WordPress, what we really mean is updating it on your server. But, you don’t even have to log into your server’s dashboard to check your site's PHP version. To do that, go to your WP dashboard, click Tools and open Site Health:
There, check the Recommended Improvements section. If it’s not there, look in the Passed Tests section and search for one checking your PHP version.
In the below example, the site is running a PHP version that’s supported by WordPress:
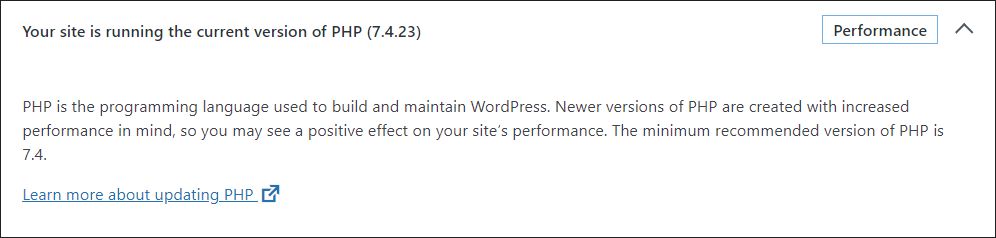
In this case, we don’t need to do anything – we’re running the recommended PHP version. But, what to do in case it shows us our PHP is out of date? Here’s how to update PHP in WordPress.
Important: Which PHP Version Should You Update to?
Seeing PHP 8.0, you might be asking yourself: “Which PHP version should I be using?” As of writing this guide (September 2021), WordPress doesn’t fully support PHP 8.0 yet (it’s marked as beta support). Because of that, it’s best to stick to the recommended WordPress 7.4.
4. Before Updating PHP in WordPress: Backup Your Site!
Depending on the server that you’re using, updating your WordPress PHP version might be a walk in the park. However, even if it takes you a few clicks with your mouse to do that, it can have huge implications for your website.
For example, your theme or plugins might stop working. It’s not that big of a deal if you can spot the issue immediately. But what if a plugin stops working and you miss it? For example, imagine opt-ins stop forwarding emails to your autoresponder. Every email that you miss out on is a lost opportunity.
That’s why, before you update your website, it’s critical that you create its backup. To find out how to perform a WordPress backup using WP Blazer’s built-in tool, check out this article.
Alternatively, consider creating a staging environment on a separate domain. Note that not all hosting providers make it easy to create one. But, if they do, you'll get an excellent testing environment.
If you can clone your website on staging, change PHP version for that website, before doing that on the live site.
Naturally, even if the staging website passes all tests, you should still back up the main site..
5. Updating PHP version in Different Control Panels
Because PHP is a server-side, not a WordPress-side thing, the update process will depend on the hosting that you use. If you’re on a managed hosting, the easiest way to do that is to reach out to your hosting support team. Then, either ask them how to update PHP in WordPress and do it yourself, or let them do that.
However, if you don’t want to wait or you’re on your own, here are a few examples of how you can do that. Obviously, we can’t go over all server control panels and setups. Still, here are a few popular options:
Updating WordPress PHP If You’re on cPanel
cPanel is one of the most popular and convenient control panels out there. Thanks to its built-in one-click installations, it’s an easy choice for WordPress sites.
Luckily, updating PHP for a WordPress website is very straightforward. The whole process in cPanel shouldn't take you more than just a few clicks. To do that, log in to your cPanel dashboard and scroll down to the Software section.
There, click MultiPHP Manager:

Once you’re in MultiPHP Manager, select the domain you want to update and choose the desired PHP version.
Note: If you won’t be able to find the desired PHP version in your MultiPHP manager, reach out to your host’s tech support. It’s possible they need to install it before you’re able to select it.
Updating PHP If You’re Using Plesk
Plesk is another popular control panel with built-in support for one-click CMS installations. And you can update WordPress PHP in Plesk just as easily.
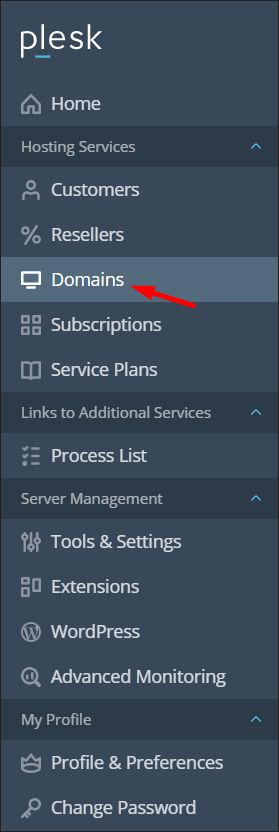
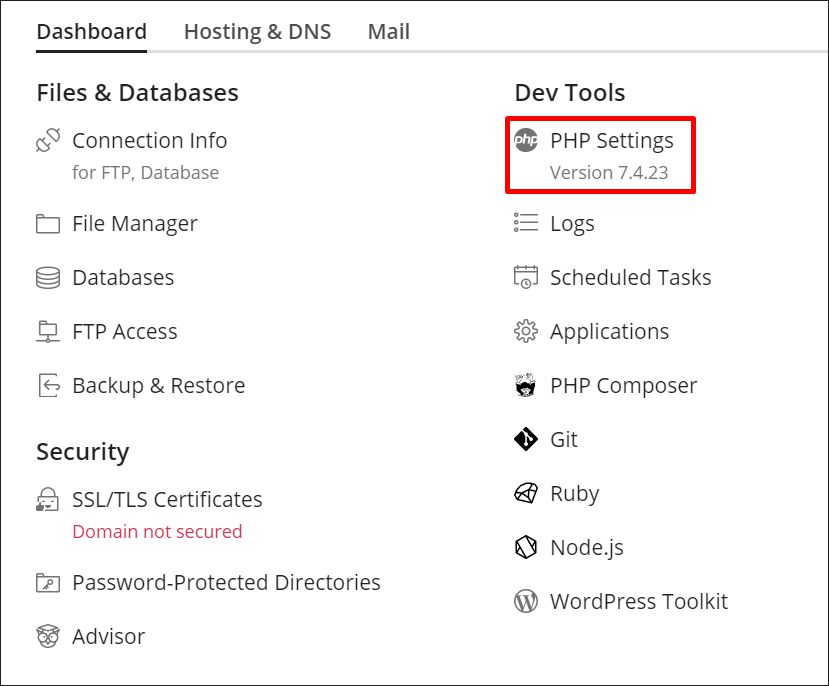
First, log into your Plesk dashboard. Then, select Domains in the left-hand side menu:
Next, choose the domain that you want to update:

In the domain management dashboard, double-check the current PHP version. You can find it right under the PHP Settings button:
In our case, the domain is running 7.4.23, which is fully supported by WordPress. In case yours was 7.3 or lower, click the PHP Settings button.
Then, select the PHP version that you want to update to, from the drop-down list.
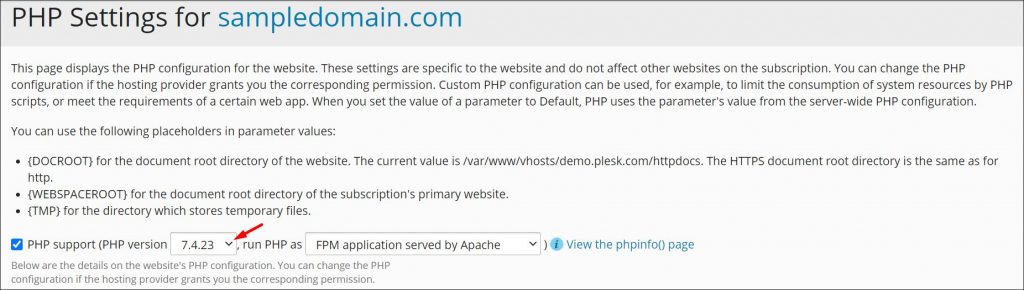
Once you do that, review the performance and other settings. Lastly, scroll down to the very bottom and hit OK. The change itself shouldn’t take more than a few minutes:

Updating WordPress PHP When Using CentOS Web Panel
Centos is one of the most popular hosting panels, especially for its stellar free version. Its only drawback is that it doesn’t offer built-in support for One-click CMS installations. Still, it’s used often enough to include it in our list.
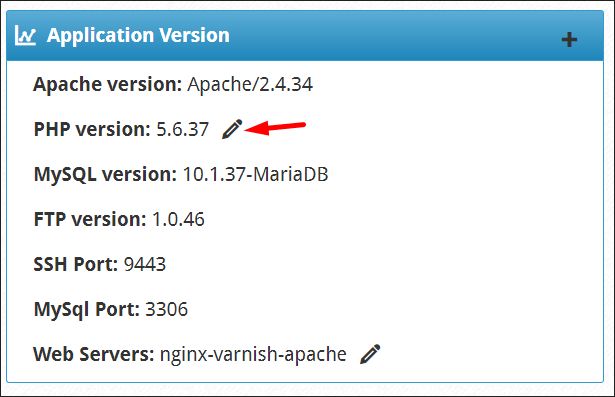
Thankfully, updating the PHP version in CentOS is very straightforward too. To do that, scroll down to Application Version and click the edit button:
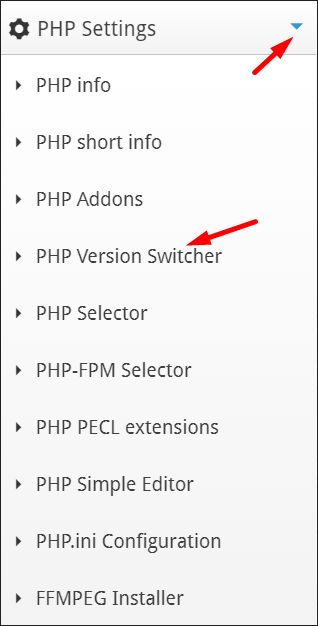
Alternatively, select PHP Settings in the left-hand side drop-down menu. Then, click PHP Version Switcher.
In the dashboard that appears, click the select a version drop-down list. Then, select the PHP version that you want to upgrade to:
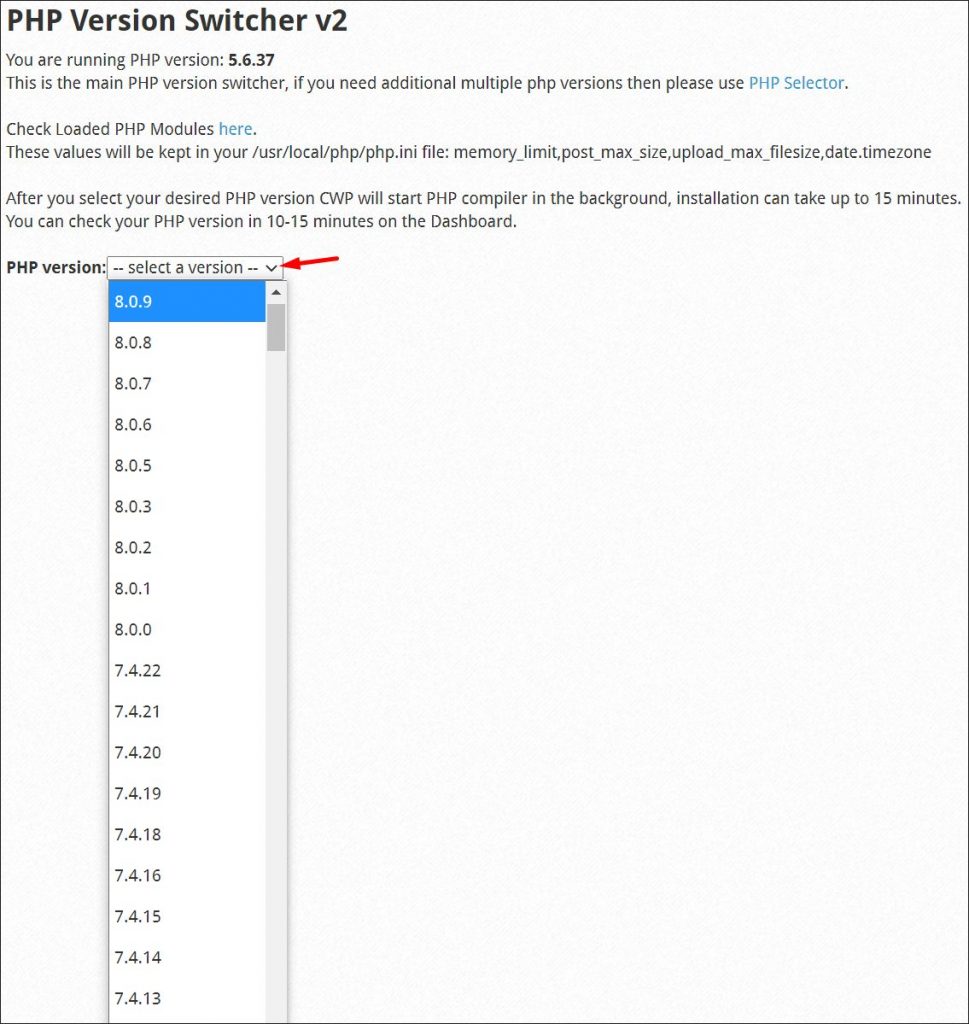
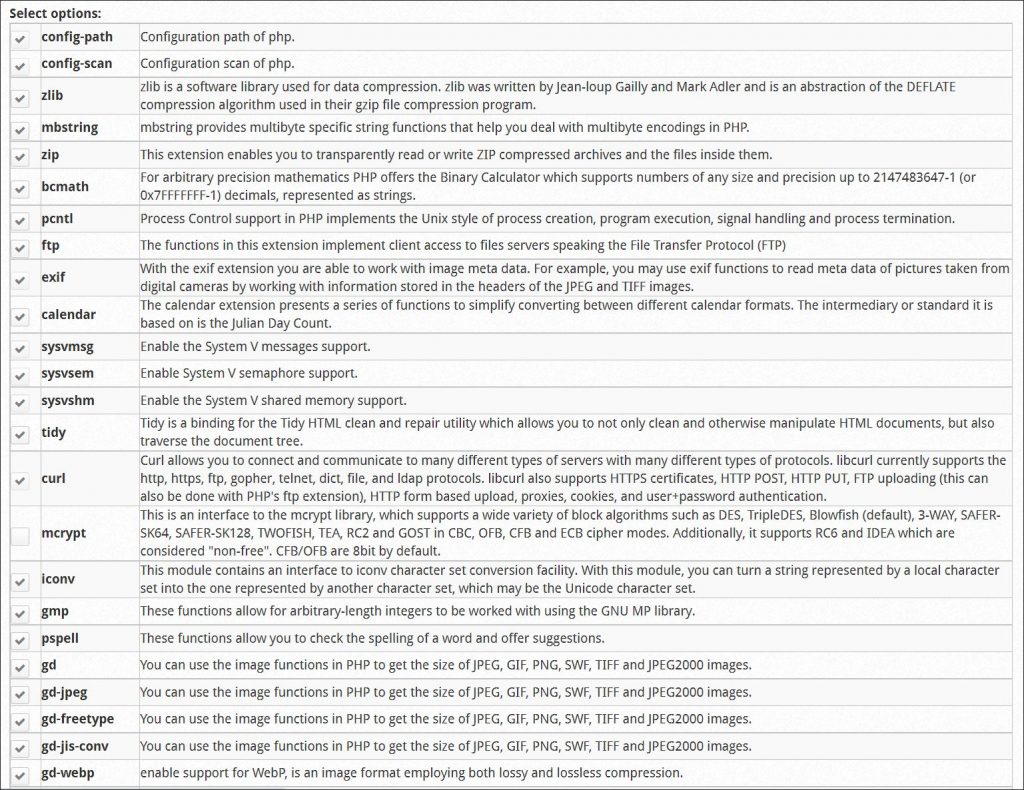
Because CentOS Web Panel is aimed at advanced developers, you can even hand-pick PHP packages for your installation. But, unless you’re 100% certain what you’re doing, it’s best to leave all the settings as default:
Scroll down and hit the Save & Build button to start the compiler:

If everything is set up correctly, you should see the following message:
PHP Compiler Started in Background. You can monitor PHP rebuild from the console using command: tail -f /var/log/php-rebuild.logThe update shouldn’t take more than 15 – 20 minutes. After that, your server should be running the PHP version of your choice.
6. After Updating: Do the Testing!
Once you update your WordPress site's PHP, there are two things left for you to do.
First, go ahead and update the theme and all your plugins. You want to be testing all their latest versions. You want to ensure you don’t miss any issues that could occur after the plugin/theme is updated.
If you’re managing many WordPress websites, updating all your plugins and themes is a real pain.
To save the time needed to jump between different sites, check out WP Blazer’s Theme & Plugin Management feature. By using the plugin, you can do all the updates inside one convenient dashboard.
Once you finish the updates, it’s time to start testing your website.
Start by disabling all plugins on your website. Then, switch to a default WordPress theme (the latest one from the “Twenty” series).
Go over your website and see if it’s loading correctly. Naturally, things will look weird, especially if you were using page builder. But, if the website doesn’t crash, go ahead and switch back to your main theme.
Then, list down all the plugins that you’re using and start enabling them, one by one.
When testing plugins, remember that PHP updates could cause bugs in functionality. So don’t just focus on whether the plugins look good on the website.
“Play” with a plugin and its options whenever possible. Check any forms and widgets, and don’t forget to test your website in different web browsers.
Note that if you’re using external caching, you need to clear the cache before starting the test! Otherwise, you risk that what you see is the old version of your website.
Of course, if you can create a WordPress development environment – that’s where you want to run all the tests!
7. Update Your WordPress Site’s PHP Now!
Every PHP version is a leap forward. Now that you know how to update PHP in WordPress, you shouldn’t wait with doing so for too long! Of course, you don't have to jump on the latest PHP version the moment it’s made available. At least, until you know it's secure and compatible with your WordPress site.
But, as soon as it’s officially supported by the latest WordPress version, go ahead and update it. That way, you can reap all the performance benefits while keeping your website secure and future-proof. And, if you’re still running PHP 7.3 or lower – update to 7.4 immediately!
And, of course, don’t forget to backup your website before updating. To back up your site (or multiple sites) easily, don’t forget to check out WP Blazer’s Backup feature. Sign up for a 14-day trial and get update your PHP version today.