
HTTP. HTTPS. SSL: Those may be nonsensical acronyms to some but if you have a website, they’re important to understand. This post will tell you why, and if you haven’t done it already, tell you how to install a WordPress SSL certificate.
Table of Contents:
1. What is SSL?
2. Why do You Need a WordPress SSL Certificate?
WordPress SSL Certificate for Security
WordPress SSL Certificate for SEO
3. How to Install a WordPress SSL Certificate
4. Install a WordPress SSL Certificate Using a Plugin
WPBlazer SSL Management
5. Force HTTPS on your WordPress Site With .htaccess
6. Use a WordPress Plugin to Rewrite URLs
7. How to Resolve Mixed Content Issues
1. What is SSL?
SSL stands for Secure Socket Layer. It’s an internet security protocol used to encrypt communication between two computers or devices—whether they’re on the same network or via the internet.
It was developed in 1995 by Netscape, one of the original web browsers, with the purpose of creating and maintaining privacy and data integrity. It’s the predecessor of today’s TLS (Transport Layer Security) encryption method.
But don’t be confused by the names. There is very little difference between SSL and TLS—the name change was more about change in ownership than technology. When SSL 3.0 was updated to TLS in 1999, Netscape was no longer involved in development.
Whichever term is used—SSL, TLS, or SSL/TLS—they all mean the same thing.
Any website that implements SSL encryption has HTTPS in the URL instead of HTTP.
2. Why do You Need a WordPress SSL Certificate?
Let’s talk about a few reasons why you want an SSL certificate for your site.
Use a WordPress SSL Certificate for Security
You need a WordPress SSL certificate to keep user data safe, prevent hackers from creating fake clones of your site and injecting malware, and verify site ownership.
If you have an eCommerce website or any kind of site that asks users to share personal information, you must have encryption to protect their information by keeping it confidential. A WordPress SSL certificate is the answer, as it will keep your online interactions private.
Use a WordPress SSL Certificate for SEO
In 2014 Google announced on their blog that they were starting to use HTTPS as a ranking factor. That means their algorithms started taking into account whether a site was using secure, encrypted connections.
In September of 2016 they made another announcement—that starting January 2017 they would display a site’s secure connection in the address bar of Chrome. Other browsers eventually followed and today, sites that don’t have an encrypted HTTPS connected will show a warning in the address bar that the site is insecure.
At this point, sites without HTTPS have two strikes against them. They won’t show up anywhere near the top of the SERPs and visitors that land on the site without search will be warned about the lack of security—and potentially bounce away.
If SEO is important to you or if your site requires users to sign in or share any information, you need a WordPress SSL certificate.
3. How to Install a WordPress SSL Certificate
Depending on the company that hosts your site, they may offer a free WordPress SSL certificate as part of your hosting package—typically from Let’s Encrypt, but there are other SSL installation and management options.
If your host—for example, GoDaddy—doesn’t offer a free certificate, the average cost per year is about $60. So before making your final decision on a hosting plan, factor in the costs of a WordPress SSL certificate.
You’ll also need to know what kind of server your host uses, Apache or Nginx. If your certificate provider doesn’t list Nginx, simply choose the “other” option.
If your host does offer a free certificate, you will find their available options via your cPanel.
Since some hosts—especially those who have a Cloudflare integration—will automatically protect your domain, it’s a good idea to confirm that you don’t already have a WordPress SSL certificate before trying to install one.
For those of you who need to purchase a certificate, here’s a list of some of the cheapest.
- CAcert
- Comodo
- Network Solutions Xpress
- RapidSSL
Once you have your WordPress SSL certificate you want to ensure that you have it installed on both your www and non-www site. So it won’t matter if someone types the URL www.yoursite.com of yoursite.com in the address bar—both are secured.
For example:
http://yoursite.com will resolve to https://yoursite.com
http://www.yoursite.com will resolve to https://www.yoursite.com
While you shouldn’t and likely don’t—assuming you’ve selected your chosen URL in WordPress General Settings—have a www address plus a non-www address, you have no control over what a visitor types in the address bar.
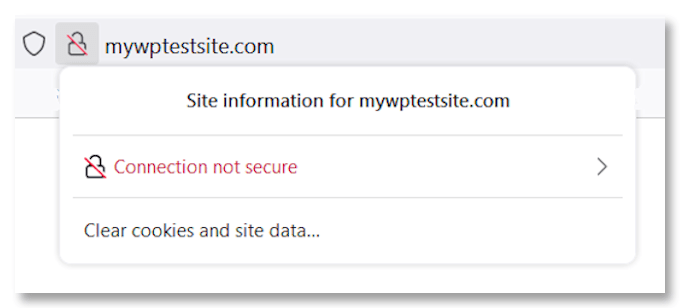
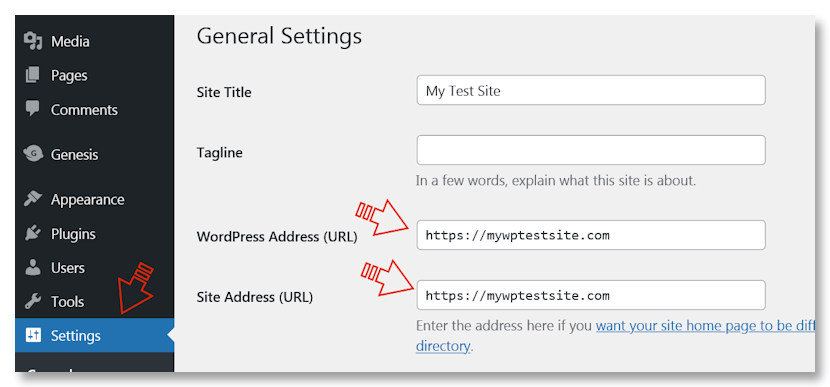
In the example below, my test site uses a non-www URL.

It typically takes anywhere from a few hours to a few days for your new WordPress SSL certificate to install, but it’s rare to take more than a few hours.
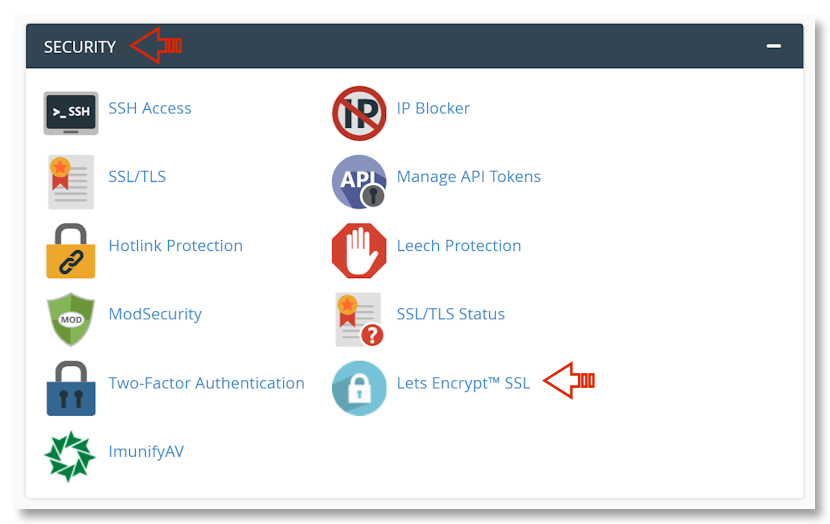
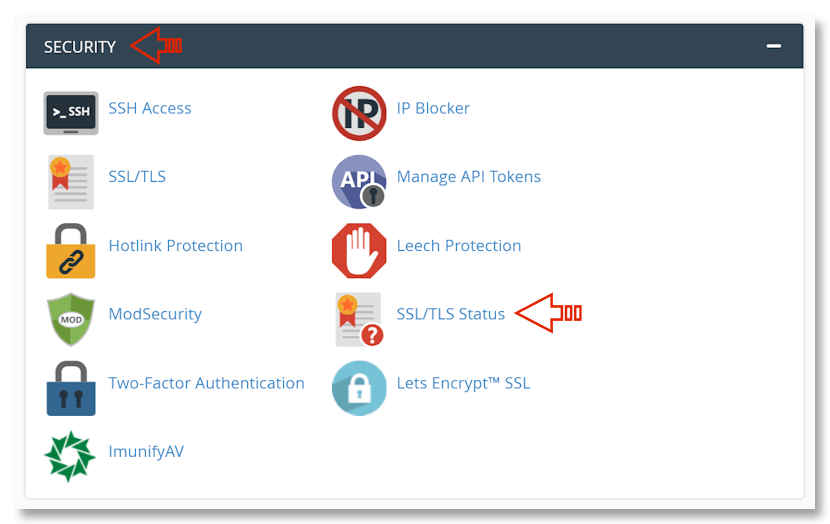
In order to check the status of your installation, you can find it under your Security settings in your host’s cPanel or equivalent.
Or, If you prefer something more direct, simply type HTTPS://yourdomain.com in your browser’s address bar and see if it loads. If it does, your SSL certificate is working properly. However, if your browser responds with an error or warning, your certificate hasn’t been installed.
Unfortunately, you’re not provided with any specific information, so wait a few days to see if it will install. If things don’t change after a few days, contact your host and ask them to check for issues.
4. Install a WordPress SSL Certificate Using a Plugin
If you’re not comfortable making this type of change from scratch, you have the option of installing a WordPress SSL certificate using a plugin.
One of your best options for this is the Really Simple SSL Plugin.
This plugin will automatically detect your settings and then configure your site to allow it to run on HTTPS. This is a lightweight plugin with few options, giving you a one-click process to secure your site.
You just need to follow 3 simple steps:
1. Install and activate the Really Simple SSL plugin
2. Generate a free Let’s Encrypt WordPress SSL certificate
3. Enable your new SSL certificate
If you decide to go with the Pro version, you have several improved security features.
- Mixed Content Scan & Fixer (More On This Later)
- HTTP Strict Transport Security
- Configure an HSTS preload list
- Advanced Security Headers to secure content security policy, permissions policy, and more
WPBlazer SSL Management
Another option is to use a tool that’s part of a larger suite of WordPress management tools.
WPBlazer’s SSL management tool provides you with a free WordPress SSL certificate from Cloudflare and installs it for you.
5. Force HTTPS on your WordPress Site with .htaccess
Once you have your WordPress SSL certificate installed and enabled you will need to force WordPress to recognize and encrypt your site behind the new security settings.
This step requires you to edit your WordPress .htaccess file so make sure you either do a full backup of your site or just this file alone before making any changes.
If you’ve never made any changes to your WordPress core files this step may seem a little daunting, but as long as you follow the steps exactly you shouldn’t have any problems.
Step 1. Update Your WordPress Settings
- Log into your WordPress dashboard and navigate to Settings >General.
- In the WordPress Address (URL) and Site Address (URL) fields update HTTP to HTTPS.
- Save your changes.
- Note: This step will log you out of your WordPress admin, and you will need to log back in again.
Step 2. Set up 301 Redirects in Your .htaccess File
A 301 redirect reroutes search engines and users to your new URL. For example, if Google doesn’t crawl your site often, a Google search could lead potential visitors to your old HTTP site, and they’ll get a 404 not found error.
Additionally, without a 301 redirect:
- Anyone directly typing your old HTTP URL into their browser’s address bar will get a 404 not found error.
- Any links to your site that were added before the change will be to your old URL. This is potentially disastrous for any WordPress SEO you’ve done as well as any organic links available on the web. They will all return site not found errors.
Here are the steps:
Warning! Before making any changes to your .htaccess file, make sure you either take a full backup of your entire WordPress site or just this file.
Using File Manager . . .
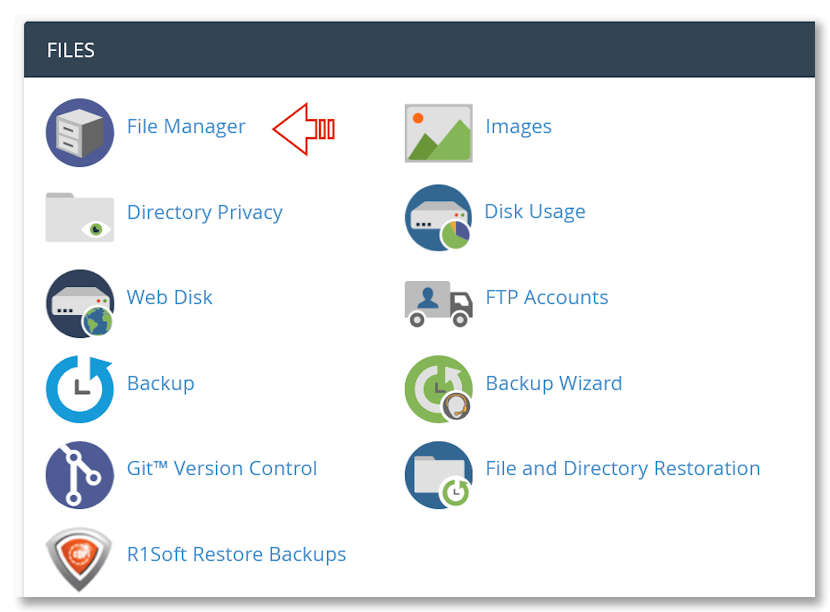
- Log into your host’s cPanel or equivalent and navigate to your File Manager.
- In the right-side menu panel, find and click to open your domain (if you installed your WordPress site at the root). It may be inside your .public_html directory
- In the navigation panel to the left, find your .htaccess file and right-click to open and edit.
Add the following code but pay attention to the following. If your .htaccess file already has the line RewriteEngine On somewhere, don’t duplicate it!
RewriteEngine On
RewriteCond %{HTTPS} off
RewriteRule ^(.*)$ https://%{HTTP_HOST}%{REQUEST_URI} [L,R=301]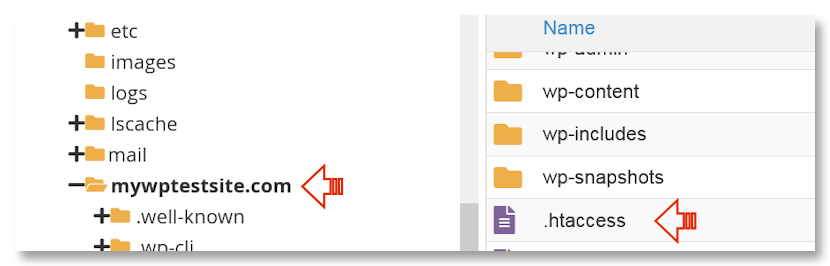
Using FTP . . .
Many prefer to manage and edit their WordPress core files via an FTP client that provides access to the files on your server.
There are many free options to choose from including, in no particular order:
- FileZilla
- Cyberduck
- FireFTP
- Classic FTP
- WinSPC
Follow these steps.
Note: If you access your WordPress site via FTP and can’t find any .htaccess files, the option to see them may be off in your client settings. You can follow the steps to show hidden files under the heading Find Hidden WordPress .htaccess Files in the linked post.
- Log into your FTP server using the login information your host would have provided you with in your welcome email after signing up.
- Depending on your client and the way you have your view set up, you may see your directories and files in a lefthand pane like in my example above. You’ll need to find your .htaccess file within your domain’s WordPress install. Once you find it, right-click to edit.
- Add the following code but pay attention to the following. If your .htaccess file already has the line RewriteEngine On somewhere, don’t duplicate it!
RewriteEngine On
RewriteCond %{HTTPS} off
RewriteRule ^(.*)$ https://%{HTTP_HOST}%{REQUEST_URI} [L,R=301]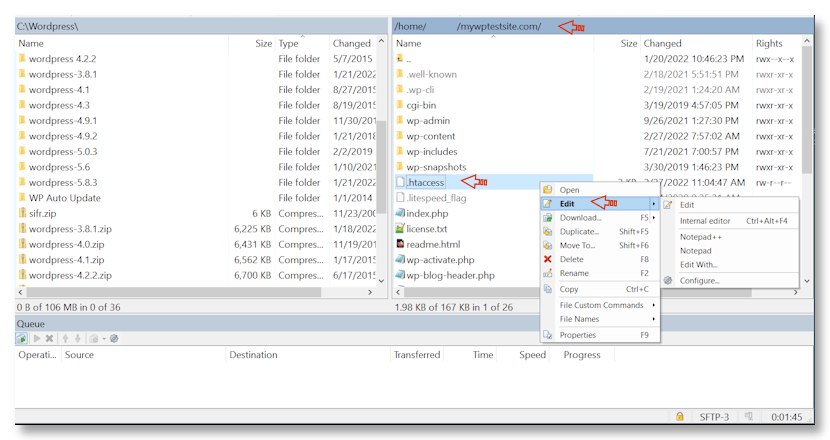
6. Use a WordPress Plugin to Rewrite URLs
If you’ve done a lot of internal SEO on your site, and you’re in the process of adding a WordPress SSL certificate, then going through all your content and updating your URLs is going to be a tedious process.
Fortunately, there is a better, faster way. The Better Search and Replace Plugin.
Follow the steps below to update your site's URLs to your internal images, media, and links.
Step 1.
Install and activate the plugin via Plugins >Add New.
Step 2.
From your WP Dashboard menu, go to Tools > Better Search Replace.
Step 3.
Update the Search for and Replace with fields with your old and new URL respectively.
In the Select tables dropdown, choose the wp_options, wp_postmeta, and wp_posts tables. Note! If you have WooCommerce or any other plugin that will generate URLs on your site, you’ll need to scroll through this list of database tables and include them as well.
Step 4.
If Run as dry run is checked, uncheck it and then run the search and replace.
7. How to Resolve Mixed Content Issues
After installing a WordPress SSL certificate it’s very common to get mixed content error warnings. Your site may be secure, and you may be getting the padlock icon on your browser address bar, but some pages may return an info i icon instead.
Seeing that icon instead of a padlock indicates there are mixed content issues on that page.
Some examples of HTTPS mixed content warnings are:
- Be careful here. Some content on this page is not encrypted
- Connection is Not Secure
- Only secure content is displayed
- Your connection to this site is not fully secure
These warnings are telling you that while your site is secure, some of the assets or elements on that page aren’t protected. That there are URLs that are trying to serve content using HTTP instead of HTTPS.
This could be URLs to things like your:
- CSS and or JavaScript files
- Hotlinked images
- Links on your CSS or JS files that lead to external scripts
To scan and check your site for errors you can use the free Why No Padlock? tool. Then you’ll need to manually go through your site to find the files that need the address updated.
Conclusion
Everyone wants to feel safe online and everyone who administers a site needs to do their part in ensuring that. And as a site owner, you know that an unsecured site will drive visitors and shoppers away—it will drive Google and other search engines away too.
So it’s important to have a WordPress SSL certificate on your site. And since WordPress management, in general, is important, why not check out WPBlazer?