Gzip WordPress makes your site faster. It's no secret that a faster loading website will help you reap the benefits of better traffic, both organically and via Google. Let's look at how to do this on a variety of platforms and what is the best option for you and your business.
Table of Contents:
- Introduction
- The importance of Gzip Wordpress Usage
- Short History of Gzip Compression
- Check if Gzip Compression is Enabled
- Various ways to enable Gzip compression
- Final Thoughts on Page Load Times
Introduction
Website speed is the name of the game, and there are several ways to do it, as I've talked about before. It can be boiled down to monitoring your website for anything that is affecting the speed (such as plugins and themes) and dealing with them quickly. Of course, there are a lot more tips and tricks, so you can check the in-depth list at the provided link.
One of the major issues mentioned is compression, specifically compressing images so that they load faster. This is a "first look" speed hack that is blatantly obvious. Big files, longer load times, slower loading site. Right?
Do you know what takes up the vast majority of your website?
If you guessed "text", as in content, then you are very close to the truth. It is text, but not in terms that would be immediately apparent. Simply, the vast majority of the text in your webpage is going to come from the code that allows everything to be shown in your browser.
Thousands of words, that very few people will ever really look at, need to be downloaded, decoded and transcribed into something that is "human-readable". All these words will have spaces, tabs and comments depending on who wrote the code (or who wrote the code that generated the pages). Empty space also needs to be downloaded - and getting rid of it will massively help with speeds.
Is that really so important?
The importance of Gzip Wordpress Usage
Of course! Think about it in terms of a book. A standard paperback (6" x9", 160 pages) clocks in at 15ounces (around 430 grams in metric). This weight is fine when you are reading one book, but what if you are going on holiday and don't have a Kindle? You might want an extra book or two or even three. Many readers can pack half their weight allowance only in books for even short trips.

Now… if there were no digital books, what could be done about this? How to make these weigh less? Simple - use less paper. Simply put, take out all the spaces, the commas and everything else that helps us separate words and you'd probably have a book around a third the weight of the weight. Would it be useful to a human? No.
It would, however, be useful to a computer.
Mobile phones have powerful processors, and mobile internet is getting faster with every generation, but dense code (much like a dense book) is still highly valued to conserve bandwidth. It is something that Google has been pushing since 2018. Today, in 2020, if your WordPress text compression does not use Gzip (the de-facto standard), it could mean an instant downgrade in the Google rankings. That's the effect Gzip has on website speed.
It's that simple.
Short History of Gzip Compression
First, let's start with the basics. What is Gzip? It's both a file format and an application for compressing (and decompressing). Jean-loup Gailly and Mark Adler created it as an alternative to commercial programs used in Unix systems. They decided that it would be open source, hence the G (standing for GNU) prefix. IT was first released in 1992 and has gained massive popularity with the growth of free and open-source software. Particularly since it was added to Chrome - meaning that everyone will have it on their computer. What Chrome does, others follow - and all major browsers now have Gzip included by default.
Since all browsers have Gzip capabilities, and all servers support it - there is no reason for it not to be put to good use, even without the spectre of Google coming for your rankings.
Numerous studies have shown that high load time equals high bounce rates. People are likely to bail on a slow loading website than a fast loading competitor. Those who do stay around are less likely to opt-in to your offers and even less likely to buy anything in the end. The customer demands speed - and they demand it with their actions.
Check if Gzip WordPress Compression is Enabled
Now despite Gzip being standard across all open and closed source servers, there might even be a legitimate reason for it to be (at some point) deactivated on your specific account.
How will you go about checking if your server has Gzip enabled? The easiest way is to use Base64 Guru's test. The link will take you to their Gzip test. All you need to do is to input your URL in the box, and they will give you an automatic response. Your server will either be Gzip enabled or not - simple as that.

Simply click on the "Check if Gzip is enabled" button and you will see the following result:
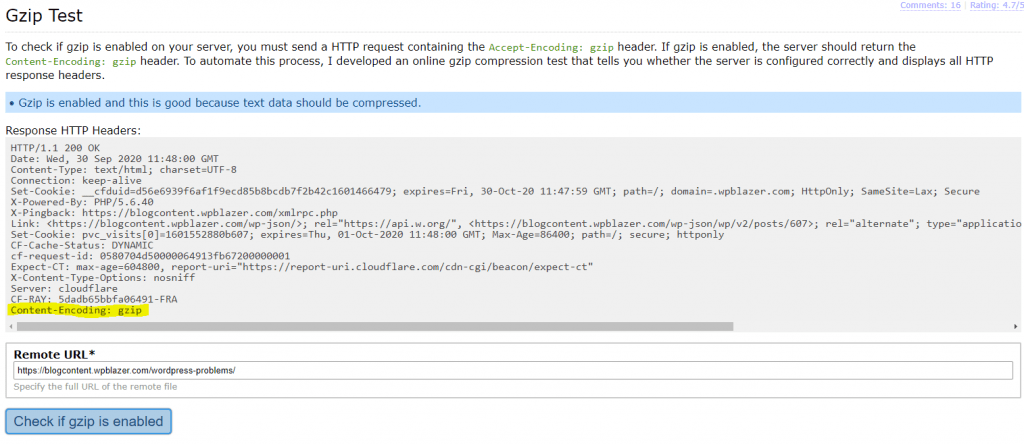
The highlighted portion shows the "Content-Encoding: gzip" header, which is what you need to look out for. It shows that everything has been set up properly and is working. Of course, since this is quite a nice tool, it also helpfully says so just above all the HTTP headers.
"Gzip is enabled, and this is good because text data should be compressed"
That quote is something on which we can all agree. Speed keeps everyone happy. You customers, then you and even Google can all be happy.
Various ways to enable Gzip compression
First of all, you have to understand Gzip itself is something that is not enabled within WordPress. It has to be installed on the server you are using for your WordPress install. Thankfully, most decent hosts will have it enabled by default in their standard hosting packages. Those that don't will require slightly more effort on your part. The first method is the most common - editing the .htaccess file in your WordPress directory.
Enabling Gzip in WordPress via .htaccess
Enabling Gzip compression via .htaccess is certainly the most common method used today. However, messing with the .htaccess file can have disastrous consequences for your websites. Always back it up, and better yet, your entire WordPress installation. WP Blazer's specialized backup options can do this very quickly for you. Once you are sure that you have a backup, then it's time to hack some code!
There are two main methods to open and edit the file. The first is via the cPanel file manager. It is pretty straightforward as you need to do is double click on the file, and it should open up a text editor. The second method is to download the file via FTP. This method is more secure as it is easier to make a backup of the file. You then open it in your preferred text editor and add the required code.
GTMetrix has provided the following code to make sure that your Gzip is up and running within WordPress. You must add it after the # BEGIN WordPress and # END WordPress tags. You need to remove
# Compress HTML, CSS, JavaScript, Text, XML and fonts
AddOutputFilterByType DEFLATE application/javascript
AddOutputFilterByType DEFLATE application/rss+xml
AddOutputFilterByType DEFLATE application/vnd.ms-fontobject
AddOutputFilterByType DEFLATE application/x-font
AddOutputFilterByType DEFLATE application/x-font-opentype
AddOutputFilterByType DEFLATE application/x-font-otf
AddOutputFilterByType DEFLATE application/x-font-truetype
AddOutputFilterByType DEFLATE application/x-font-ttf
AddOutputFilterByType DEFLATE application/x-javascript
AddOutputFilterByType DEFLATE application/xhtml+xml
AddOutputFilterByType DEFLATE application/xml
AddOutputFilterByType DEFLATE font/opentype
AddOutputFilterByType DEFLATE font/otf
AddOutputFilterByType DEFLATE font/ttf
AddOutputFilterByType DEFLATE image/svg+xml
AddOutputFilterByType DEFLATE image/x-icon
AddOutputFilterByType DEFLATE text/css
AddOutputFilterByType DEFLATE text/html
AddOutputFilterByType DEFLATE text/javascript
AddOutputFilterByType DEFLATE text/plain
AddOutputFilterByType DEFLATE text/xml
# Remove browser bugs (only needed for really old browsers)
BrowserMatch ^Mozilla/4 gzip-only-text/html
BrowserMatch ^Mozilla/4.0[678] no-gzip
BrowserMatch \bMSIE !no-gzip !gzip-only-text/html
Header append Vary User-Agent
Once you have added it and saved, you should be ready to go. Run the website through the Gzip checker provided by Base64 Guru. If it returns a positive result, well done! You've set up Gzip compression for your WordPress website.
Enabling Gzip on non-Apache servers (NGINX / Microsoft IIS)
If your host does not use the standard Apache server software, then you might need to go a slightly different route. Some web hosts use NGINX instead of Apache, and the method you can use is simple. You need to find the Nginx.conf file on your server and add the following code, taken from a TechRepublic article on the topic:
gzip on;
gzip_vary on;
gzip_min_length 10240;
gzip_proxied expired no-cache no-store private auth;
gzip_types text/plain text/css text/xml text/javascript application/x-javascript application/xml;
gzip_disable "MSIE [1-6]\.";
Relatively simple, but the Microsoft version is very specific. It is best to follow Microsoft's documentation to the letter when attempting to do this on a server that uses IIS.
Benefits (and Drawbacks) of Using a Gzip Plugin
If you decide that you would rather have a plugin, do the work for you, then you're in luck. Many plugins will do the above automatically for you. However, with the ease of use that plugins offer, there is always a risk. One more plugin will give potential attackers one more way to get into your system, a trade-off you make every time you install a new plugin. However, if you lack the technical nous to do it yourself - you can't go wrong with one of these three plugins.
An additional benefit of a plugin is that you can set up any new websites to use that same plugin in the same way your original site does. WP Blazer offers several ways to do this, the most notable being the powerful Theme and Plugin Management feature offered.
PageSpeed Ninja
PageSpeed Ninja is an all-in-one plugin. It does not just add Gzip functionality; it also adds a variety of other optimizations. Enabling Gzip compression is as simple as going to the Settings > Advanced option. Then all you need to do is select "Gzip compression" under the "Enable Compression" part of the page.
WP Super Cache
While the main focus of WP Super Cache is to build a cache of your website, it also has compression options.
You need to navigate to the Advanced options for the plugin and make sure the box called "Compress pages so they're served more quickly to visitors" is checked. Once you've done that, the plugin will do the rest for you.
Enable Gzip Compression
Enable Gzip Compression is the simplest plugin of the three on offer. It is also the only one that focuses exclusively on enabling Gzip compression. While simply compressing CSS and Javascript files is a great way to speed up your website, some find it somewhat limited.
That said, it is easy to use and a useful tool if you're in a pinch.
Use your Hosting Support to Enable Gzip on Your Server
The last option you have is to use the support desk of your hosting provider. While the vast majority of web hosts do have Gzip enabled on the server by default, there will be those who do not.
Whatever situation you find yourself in, it never hurts to use the help desk that your monthly payments support. They need to guide you through any method you can think of it - it's their job. Use the help desk provided for by your hosting provider to enable compression on your server. The value provided by Gzip for WordPress websites is crucial to getting the speeds you need to remain competitive.
Final Thoughts on Page Load Times
Whatever method you choose to use, make sure that you do it ASAP. The longer you wait, the longer your website visitors are waiting - and that will cost you. Once you have worked out this step, it will be time to look at other issues that might be plaguing your website.
You could decide to use a CDN or further compress your images. You might look into building a cache of your pages so that they are served faster to your audience. Gzip compression is just the first step to making your site truly mobile (and Google) friendly. There are many more steps that need to be taken to have the fastest load times possible. Each of these will be covered in depth soon enough.